Glittery Stars

I was having a hard time deciding what to do for the 11th NPQ Christmas Challenge, the theme is Glitterbombs.  I was going to just create a manicure using red and green glitter, but wanted to do something a little different since I've done a lot of red and green lately.  I happen to be listening to some Christmas music and Elvis' version of 'O'Holy Night' came on.  This gave me an idea!  So this manicure is inspired by that song, specifically the lyrics, 'O' Holy Night, the stars were brightly shining...'

I started off with one coat of China Glaze 'One Track Mind', this is a one coat application.  I love this rich dark blue.  I also applied a quick drying top coat, to speed up the drying time.


When the polish was dry I applied a star vinyl from nailvinyls.com.  I then applied a gold polish to my stars.  I then sprinkled loose gold glitter over my gold polish while it was still wet with the nail vinyl still in place.  I pressed the glitter slightly, then tapped off the excess, and then carefully removed the vinyl.  I recommend using a polish the same color as your glitter in case any of the glitter falls off.


I used the same process (apply gold polish and sprinkle loose glitter) with hand painted half moon shape on my other fingers.  I've heard this referred to as a floating french.


I did a little cleanup by using a soft brush to brush the loose glitter slightly to make sure it was all stuck.  I then applied another thick top coat to seal in all the glitter.


There you have a slightly different Christmas song inspired manicure, that isn't red and green for a change for the 2nd day of Christmas Nail Polish Queens' Challenge.  I hope you liked this glittery nail art design.  Christmas is a few days away and I have a few more challenges to finish up so stay tuned.  Thanks for stopping by, see you soon.


Your Fellow Plebe,


Silver and Gold Nail Art


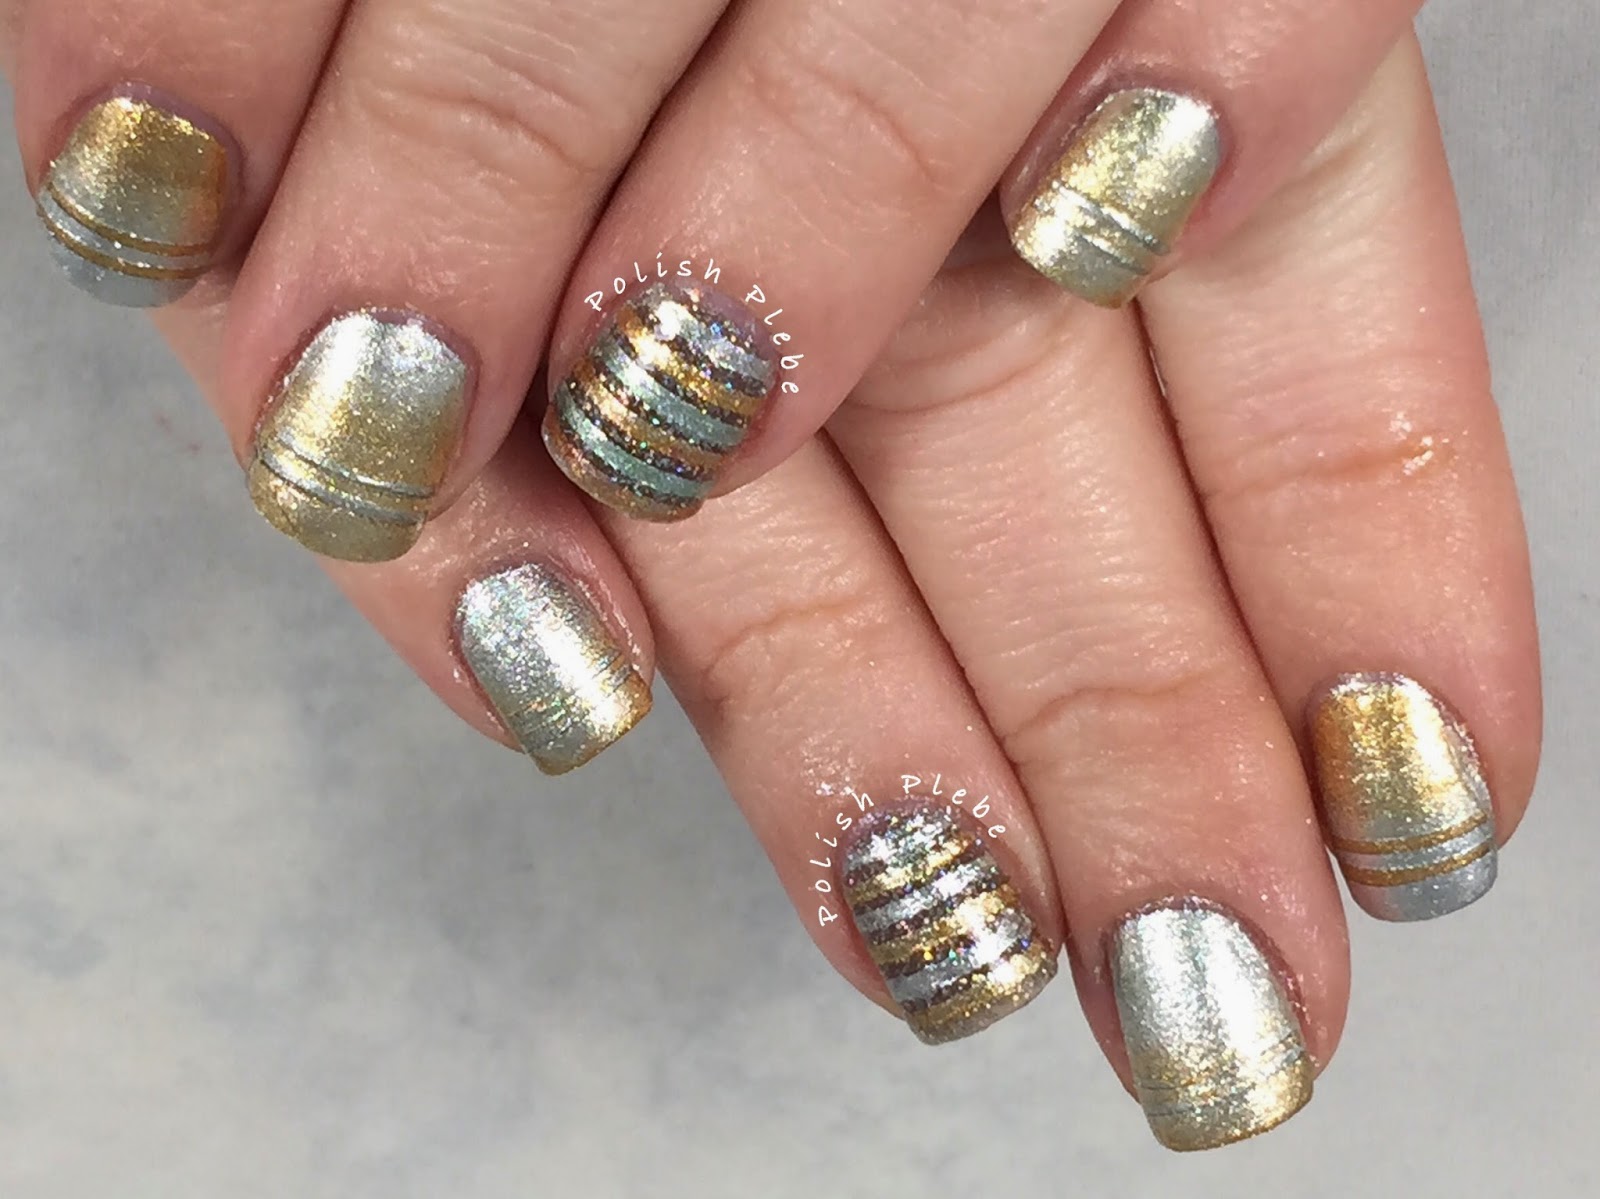
I love Christmas music and one of my favorite song is Burl Ives 'Silver and Gold.' So for the Christmas song/Carol/Movie Winter Nail Art Challenge Facebook Group.  I created these silver and gold nails inspired by my favorite Christmas song.


To create this look I started with a silver, a gold, and a glitter polish.  The silver is Revlon 'Metallic,' the gold is Sally Hansen Insta-Dri 'Go for Gold,' and the glitter is OPI 'My Voice is a Little Norse.'  I topped it all off with a quick drying top coat.


Once the base polish was dry, I applied two stripes of tape at near the tip of my nail.  Using a makeup sponge I applied a slight gradient.  Over the silver I applied silver to the top of the nail and the gold near the tip.  So, when the tape is removed two silver stripes are visible through the gold gradient.


I did the same process over the gold but reversed the colors so that the silver gradient is on the tip and the gold shows through.


For my accent finger I laid out striping tape horizontally over the entire nail.  I then alternated silver and gold and filled in each space.  Removing the tape leave glitter stripes between each colored stripe.


After a little cleanup and a shiny top coat, you're left with a neat silver and gold nail art design.


This is an interesting holiday look without being super Christmas-y.  I also really like the stripping tape gradient affect.  I think this would be really striking if you use a bold color combo, for instance a black and gold might be really interesting.


Don't forget to checkout all the other lovely nail art design in the Winter Nail Art Challenge (links below).  I hope you enjoyed my Silver and Gold Christmas Song inspired nails.  Thanks for stopping by, see you next time.


Your Fellow Plebe,


Candy Cane Plaid Nails

Today's Nail Polish Queens' Challenge is: Candy Canes.  Since, I've already done one candy cane design already I wanted to try something a little different (for me) and try out a plaid design in traditional candy cane colors.  I decided to do this design freehand both the save time, minimize layers, and give myself the opportunity to practice my freehand design.


I started my design off with a nice clean white, Sinful Colors 'Snow Me White.'  This is my go to white, I use it so often I just had to purchase a new bottle.  That's a milestone for me as a nail polishaholic because I have never bought the same brand and color twice, except for this one.


On most of my fingers I painted a plaid using red and green nail art strippers.  I started with a slightly wide red stripe diagonally across my nail.  I then added a wide green stripe, followed by two somewhat narrow green stripes over top the red.  I then finished the design by drawing narrowish red stripes on either side of the wide red stripe over top the green stripes.  I switched back and forth with the colors to create a layered look giving the stripes a more woven appearance.


On my pointer I drew a criss-cross candy can accent using the red stripper polish but a smaller brush, not the applicator brush.


After a little clean up, I applied a super shiny top coat.  Voila! Candy cane stripped plaid.  I love how bold the red and green look against the white.  Though my freehand still needs some practice, I am pleased with how my stripes turned out.  They are far more consistent that I imagined they'd turn out.


I hope you enjoyed this Christmas nail art design.  Stay tuned because there is still more to come.  I hope you are enjoying your holiday season so far, thanks for stopping by, see you next time.


Your Fellow Plebe,


Super Simple Christmas Tree Design


Today's nails are for the Facebook Group: Winter Nail Art Challenge.  Today's challenge is: Christmas trees.  I decided to do a very simple design that is quick and easy.  I decided to use slightly unconventional colors, since I've been doing a lot of Christmas nail art lately and am kind of tired of typical red and green.

I started with Lucky Lacquer 'Bells of Ireland' and a quick drying top coat.


I then used lightning vinyls from Nailvinyls.com and placed them on an angle.


Using Lucky Lacquer 'Mint Daisy' I filled in one side of the nail and of course, removed the vinyl.  Leaving the outline of one half of a Christmas tree.


I then used various other polishes from Lucky Lacquer Fleur Collection and dotted Christmas baubles on my trees.


I really love Lucky Lacquer Fleur collection, if you haven't checked it out yet, you should.  Her website is: http://luckylacquer.storenvy.com/.  In addition, to these beautiful cremes, she has many different glitter prototypes and she's adding new stuff to her store all the time.  If you make a purchase use code: Crystal to get 10% off (some restrictions apply).

I hope everyone is enjoying their holiday season so far.  There's about nine days till Christmas left, so stay tuned for more Christmas nail art designs.  Thanks for stopping by, see you next time.


Your Fellow Plebe,


Gold Tip Holly Nail Art

On the 5th day of Christmas my true love gave to me: 5 Gold Bling.  Today's nails are for the Nail Polish Queen's Christmas challenge.  I love gold and I have been wanting to create a holly design so this is the design that came to mind.


I started with one coat of Sinful Colors '24 Karat.'


I then used a small sponge and applied Anise 'Gold Nugget,' to the tip of all my nails.


On my ring fingers and thumbs I drew holly designs.  I started by dotting three medium sized red dots using Essie 'Dress to Kilt.'


I then used Revlon 'Emerald' and a small brush to draw the holly leaves.


I then added a little detail to the holly berries.  I used white polish and added highlights to the berries and a brighter green to draw a vein on the leaves.


I think this is a really simple and elegant holiday nail art design that is perfect for any holiday party or event.  It is also subtle enough that you could most likely get away with wearing it in a work environment too.  It is going to be really difficult for me to take these off, because they are so pretty.  However, I have more holiday nail art coming soon.  Thanks for stopping by, see you next time.


Your Fellow Plebe,


Nails Art Proudly Powered by Blogger