Longing for Spring - Reverse Stamping

Hello Darlings!  I hope you have all had a wonderful week and have a fun weekend planned.  As most of you know I live in upstate (I consider it more middle state) New York.  The weather has been cold and miserable.  When its not snowing it is so windy, you can barely stand up with out getting blown over.  I am not a winter person, I don't like snow or cold, and I don't care for winter activities.  I am so done with winter and really want spring to get here.

This week's #nailthattechnique challenge on Instagram is: Reverse Stamping.  For those of you that are unfamiliar with this term, it simply means making a decal using a stamped image.  This is a true challenge for me for a couple reasons; 1) I'm not very good at stamping, and 2) I don't own many image plates, which limits the images I have worth doing reverse stamping with.

I decided to give it a try and after a couple of attempts I created something I was satisfied with...


I started out with a base of Zoya 'Rooney' (from the Tickled collection), 'Dot' (the light pink, from the Awaken collection), and the lovely sparkly 'Binx' on my pinky (from the Bubbly collection).  I don't usually bling out my pinky, so I thought it was time, besides isn't so pretty?!


So as I mentioned previously it took me a couple of tries to get this right.  My first attempt was almost a complete failure, but was workable if I wasn't willing to try it again.  However, I was determined to get it right. 

This is what I did on my failed attempt (starting with the picture on the top left):
  • I have a total of four image plates, so not a whole lot to work with.  I decided to use my Konad M61 plate, the floral design to be exact.  You may recognize this from my very first stamping tutorial 'Stamping Into Spring.' Out of the few images I have to choose from I felt this had the most negative space, structured enough to fill in.
  • I used standard black polish, Sinful Colors 'Black on Black,' and stamped the full image.  I didn't want all the vines and dots, so I scraped them away using my smallest dotting tool (you can also use a toothpick for this, but I'm currently all out).
  • I then used my smallest dotting tool and filled in the flowers.  I used a Yellow Art Club Stripper for the centers and then I used Zoya 'Rebel' (also from the Awaken collection), and 'Rooney' for the petals of the flowers.
  • I then used my quick drying Seche Vite top coat to seal the entire design and create the decal.
  • Once, it was dry I used a pair of tweezers to peal it of the stamper.

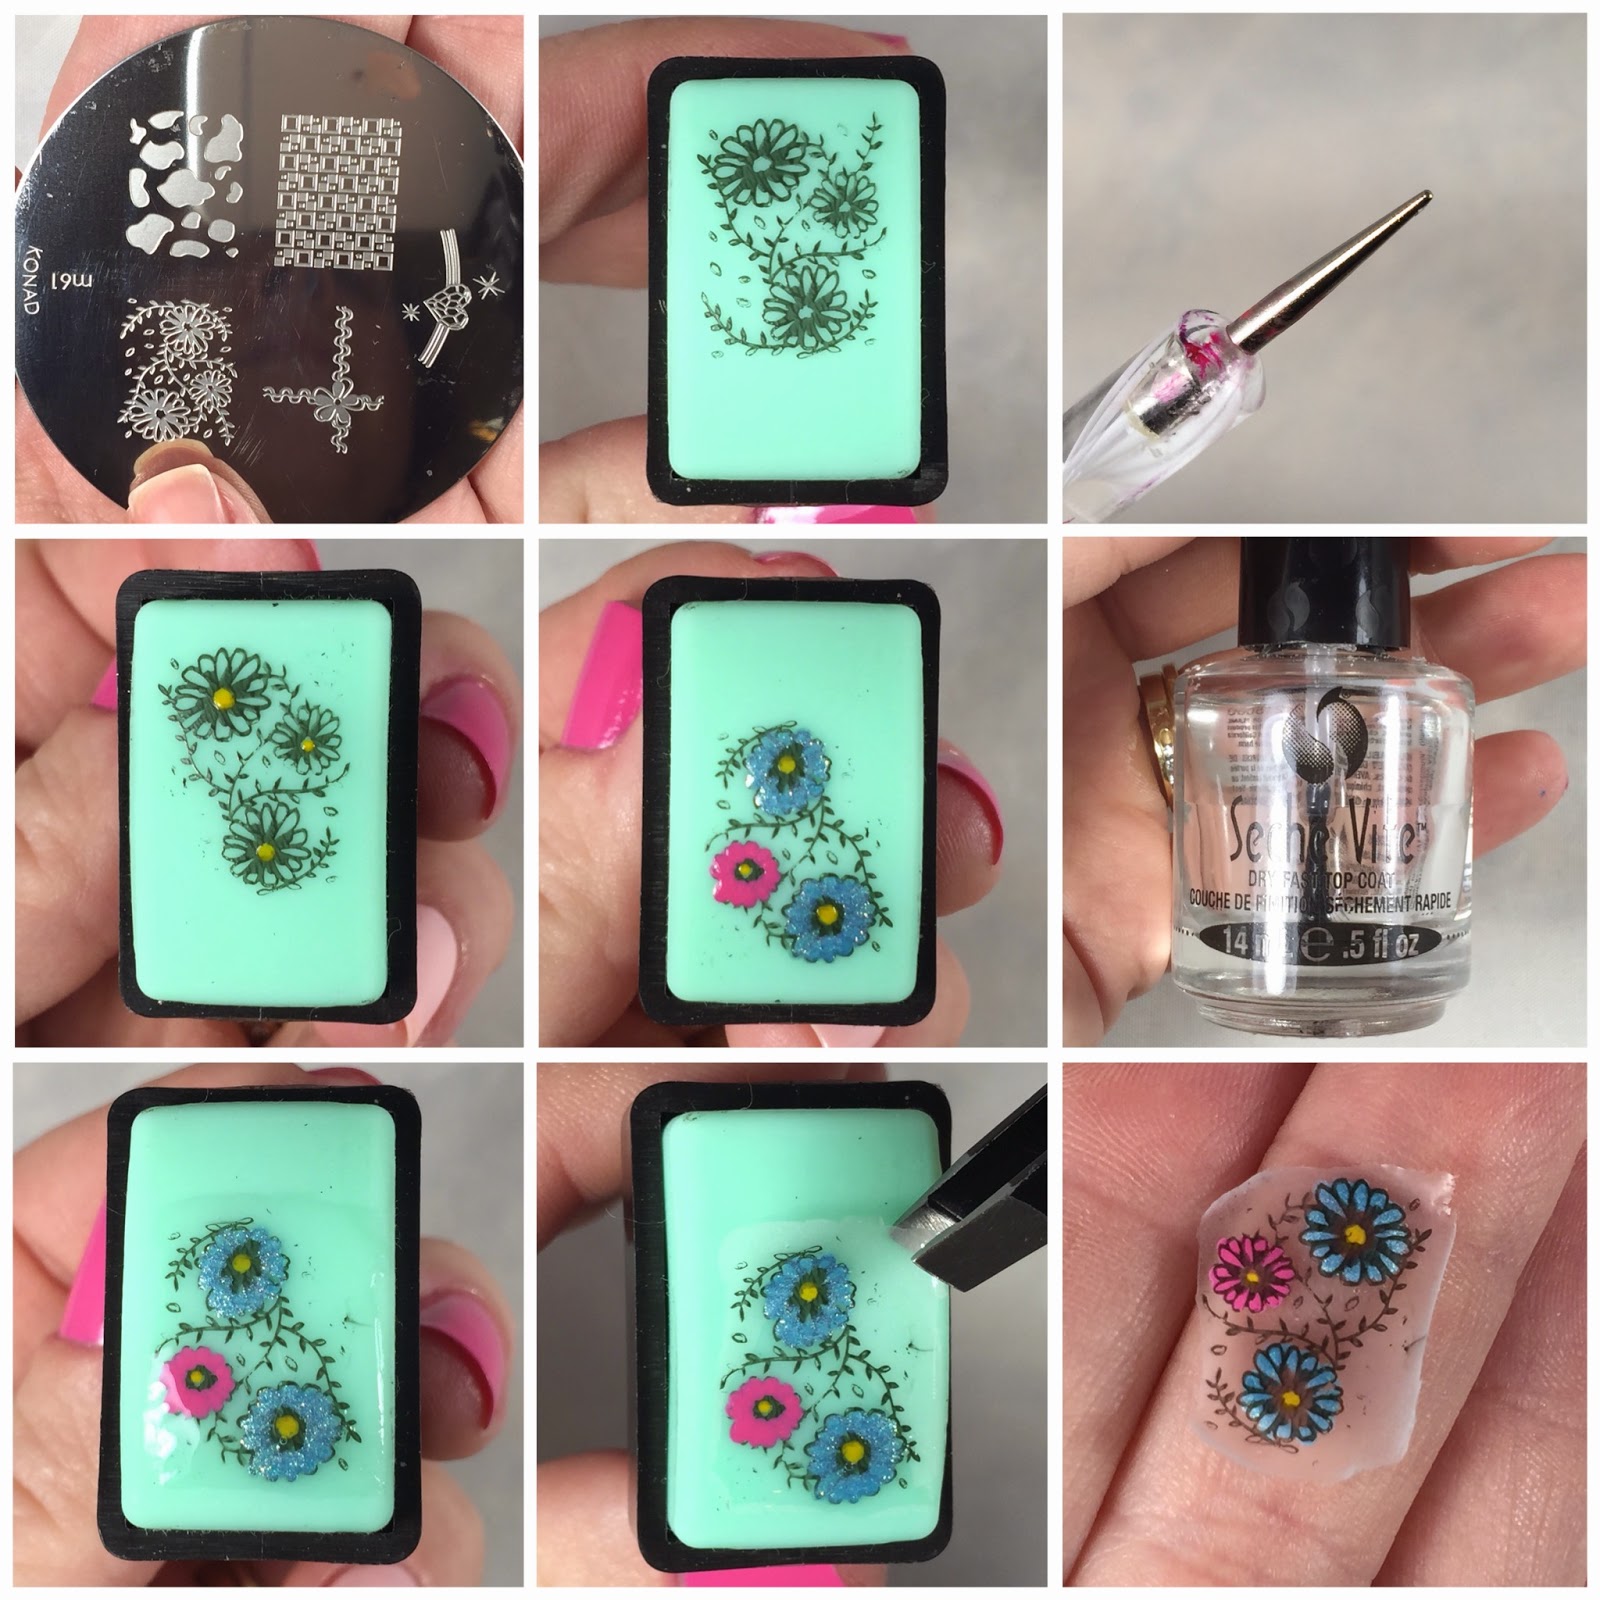
To apply it, I simply added another thin coat of 'Dot' on my ring finger and applied the stamped decal.  I had a hard time getting the image to slide into place where I wanted it, so when I was semi-satisfied with the placement, I used cuticle scissors and trimmed some of the image away.  However, to get rid of most of the access, I used my clean up brush and acetone to wiped it away.  After clean up I applied a final layer of top coat.


So, I call this a failed attempt for a few reasons that might not be too apparent in the pictures.  First, the Sinful Colors 'Black on Black' didn't pick up quit as well as I had hoped, so the image is a little dim.  Deciding to use a quick drying top coat was also a bad idea, it was very thick and even though it was dry seemed very sticky.  I think this is why I was having such a hard time placing the decal, it wanted to curl up on the edges, but stuck firm in the center without and pressure. Another failure on my part was that I had applied two layers of 'Dot' initially and then added a third for the application of the decal.  This was too many layers for my liking and made the finished product very thick.  In the end the image is too light, too thick, off centered, and bubbly/wavy and doesn't lay smoothly on the nail.

I decided to scrape this attempt all together and started over.  For my second attempt, I did a very similar process with a few minor changes.
  • This time I used my black stamping polish from bornprettystore.com, item #1381.  You can used code: CREATEX31 to get 10% off your next purchase.
  • The other thing that I did differently was that instead of using a top coat, I used 'Dot' to create the decal.  I applied to coats of 'Dot' over the image on the stamper.  For the small flower on my thumb I used Seche Vite Base Coat and gave it ample time to dry before removing it from the stamper.
  • For the application, I applied only one layer of 'Dot' to my nail and immediately placed my decal on the wet polish.
  • I used a metal nail file to press the image down around the edge of my nail plate, pressed the overhanging edge of the image down over the tip of my nail, and then used my clean up brush and acetone to carefully clean the excess.  After cleaning up, I applied my top coat.

Though this is still far from perfection in my eye, it is significantly better than my first attempt.


This is one of the rare cases where my Cinderella hand (my dominant hand that does all the major work, in my case my right hand) turned out better than my non-dominant hand.  Of course, I did most of the work with my dominant hand since I was reverse stamping.


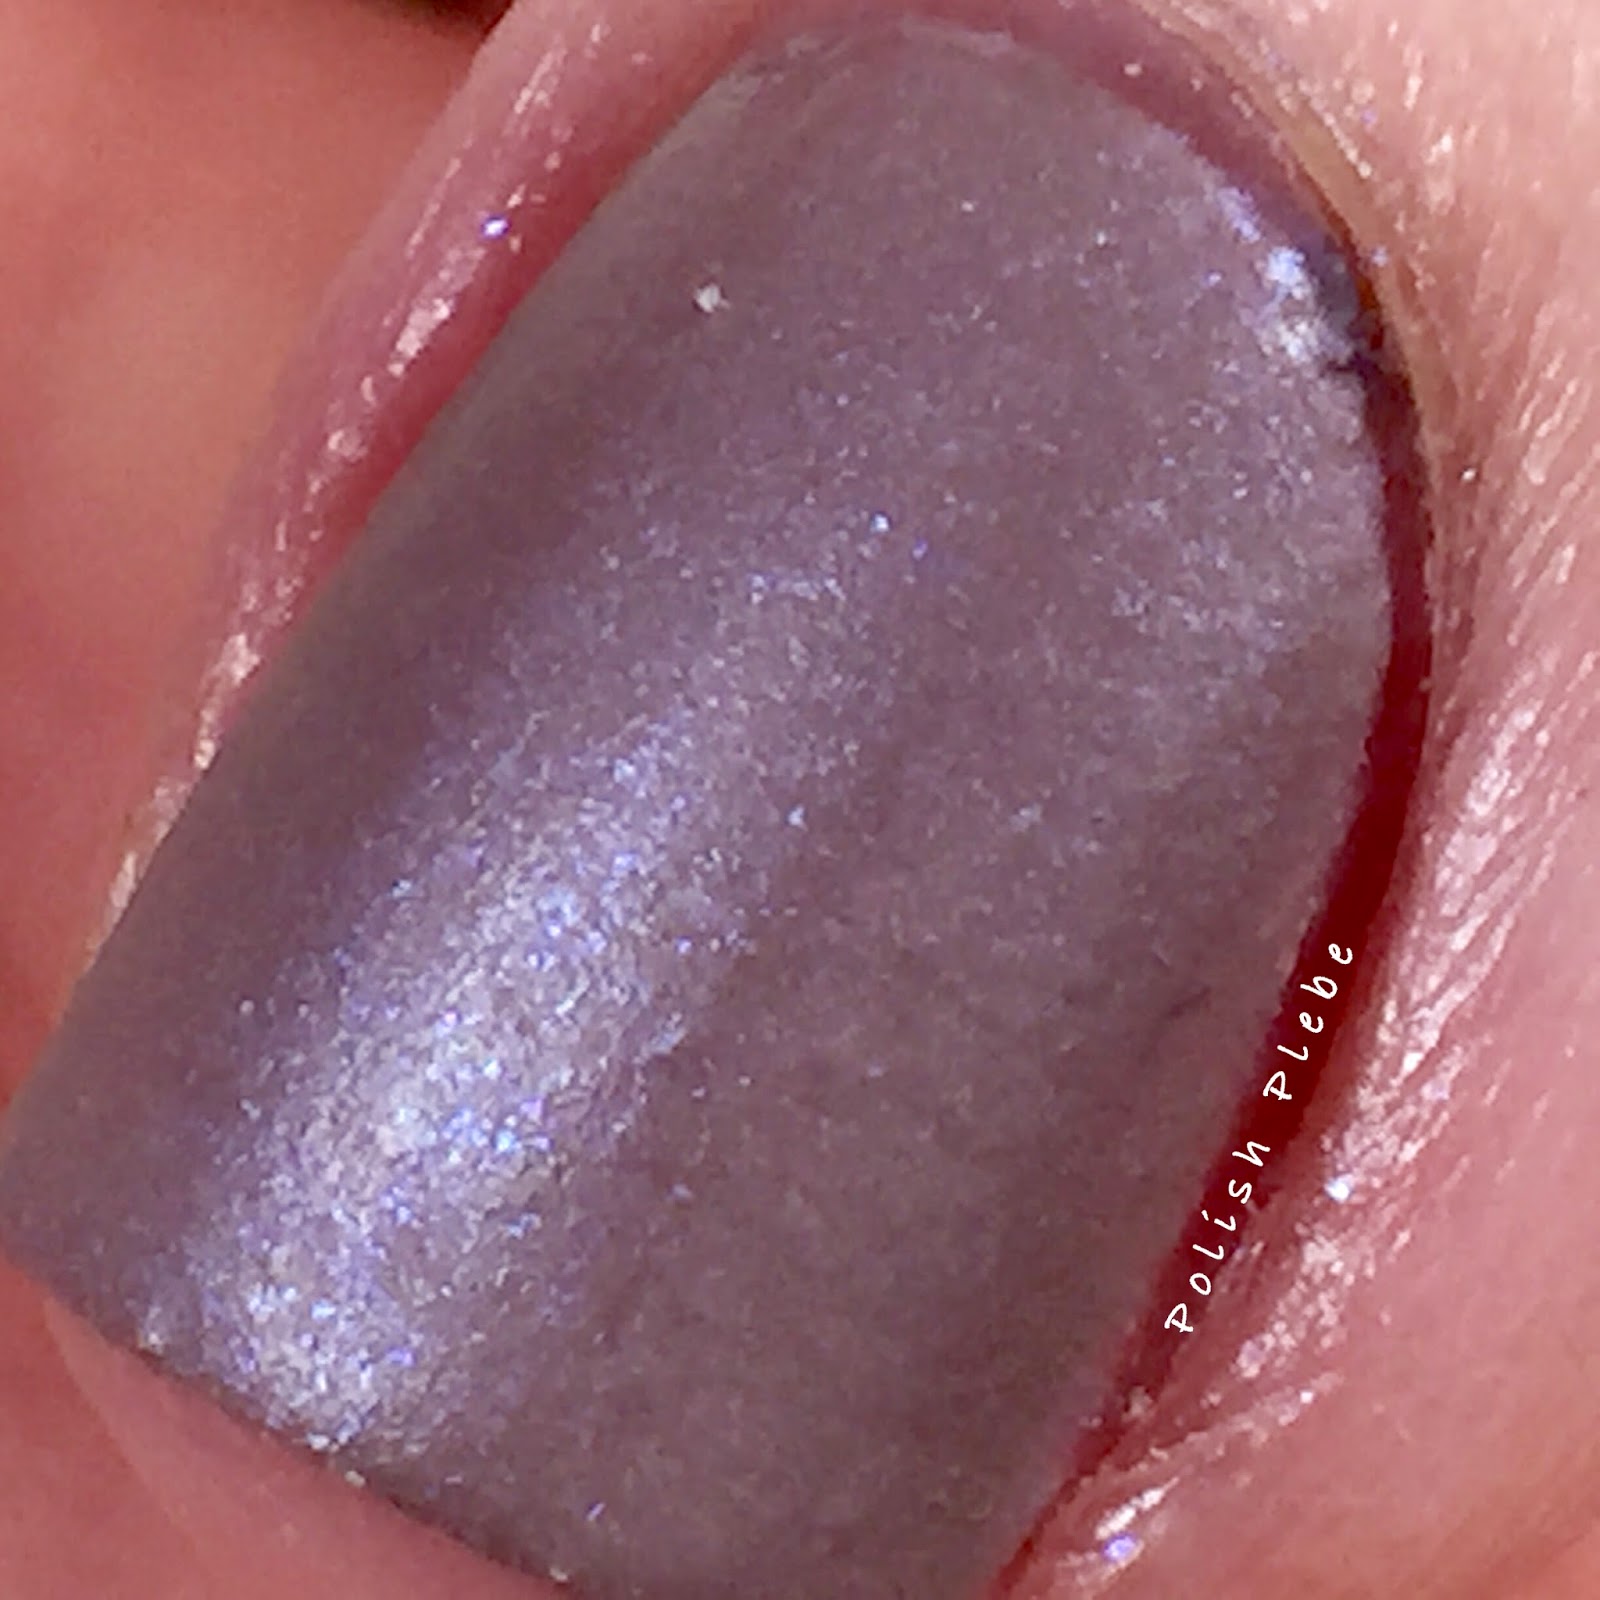
I really think I am getting the hang of this stamping thing, so it might be time for me to invest in more stamping supplies.  If anyone has any advise on who make the best stamping polishes and images plates, I'd love to hear from you.  How about a little #thumblovin, with a macro shot of the beautiful 'Rooney' and the cute little flower decal.  I think this turned out really nice, how about you?


Between, these gorgeous pinks, all colors from last years spring and summer collections mind you, and the cute flower designs I feel a little warmer already.  Where oh where, fore art thou Spring!  No seriously, where is it, I'm tired of being cold and trapped indoors.  Well at least I have this bright mani to enjoy.  I hope this mani brightened your day, and I hope you found the tips and tutorial helpful.  Thanks for stopping by, see you next time.


Your Fellow Plebe,


Reverse French Tip Using SmArt Nails Stencil

Hello Loves!  I have been craving a silver and blue manicure lately, and I need a reason to use the SmArt Nails Stencils I have had since before Christmas.  This is what I created...


I apologize for the picture being slightly out of focus but the silver that I used made it difficult to get clear pictures.  As you can see I did what I'm calling a reverse French tip on all but my ring fingers, on which I did a normal French tip.  I feel that doing a decorative French tip on my nails makes them look even shorter than they are so I normally avoid doing them.  That is why I decide to reverse the design and created the decorative area near my cuticle.

I started out with one coat each of Ciate 'Knee High,' and Revlon 'Metallic.'  I used these two colors in particular because they are very opaque with one coat, since I will be doing a couple layers this keeps it from getting too thick.  It also gives better coverage when applying one shade over the other.  This silver is also my go to silver because I love it so much.  After applying my base colors I did apply a quick drying top coat, because I am too impatient to let my base colors dry on their own.

 
With my base polishes dry I used my SmArt Nails Nail Art Stencils.  I won these back in December, on Facebook.  They often do Facebook giveaways, but if you don't want to wait for lady luck to shine favor on you, you can purchase them on their site http://www.smart-nails.com/.  They are running a 25% off sale right now until February 28th and their prices are already phenomenal so check them out.  The stencil that I used for this design is P050, but they have many other designs to choose from.
 
 
Using these stencils are no different than using any other nail stencil, tape, or vinyl.  After your base polish is dry, apply the stencil.  Be sure to smooth out the stencil and press it firmly to ensure air pockets don't occur near the edge of the design.  Use your finger or a cuticle pusher to push it firmly down along the edge of the nail bed and cuticle area.  Apply your secondary color, and then immediately remove the vinyl.  It's just that simple!


Some of you might be asking, if these are just like other stencils and vinyls why would I purchase these SmArt Nails Stencils.  Even though they are just as easy to use, SmArt Nails Stencils are very high quality and you can get a couple of uses out of them unlike other products that are one time use.  I used four out of the ten stencils provided in the pack to do both of my hands.  Additionally, there are so many different designs to choose from, whether you like classic, funky, pretty, or romantic designs they have something for everyone.  And did I mention their prices are phenomenal!  If you would like to see another mani I created using SmArt Stencils check it out here.


Back to my design...for my completed look, I applied the design just as seen in the pictorial above on my thumb, pointer, and mid finger.  On my ring finger (silver finger), I flipped the stencil around so that the tip of the nail was exposed and applied my secondary color.  This is the way the packaging shows the stencil being used.  On my pinky I only used the flower part of the design because I felt my pinky was too small for the entire design.  I did a little clean up, applied a top coat and added rhinestones to the center of my flowers.  I'm not sure why, but rhinestones are my thing right now.  I did a macro shoot of this design on my ring finger, to give you a better look at it...


This silver and blue combo satiated my craving for a silver and blue mani, and the SmArt Stencils made it quick and easy to create.  I hope you enjoyed this nail art design, thank you for stopping by, see you next time.
 
 
Your Fellow Plebe,


Syrup Gradient

Hello Lovelies!  Sorry it has been a bit since I last posted.  Last week was very busy, additionally I suffered from some serious cranial gas and completely forgot to do a mani for the Nail That Technique: Syrup Gradient challenge on Instagram.  This week's challenge is Sheer Base, so I combined the two and this is what I came up with...


The syrup gradient is the absolute easiest type of gradient to create and it doesn't require any sponges or tools.  You simple need a sheer or slightly translucent polish to create this look.

I used China Glaze's 'Choo-Choo Choose You' (from the All Aboard collection).  This is a semi-transparent polish, unfortunately I do not own any sheer tints so I thought this would do just fine.  To create the syrup gradient, apply the polish in thin layers.  Start with a rough French tip, it doesn't have to be perfect.  Continue adding layers, with each layer start the application a little higher up the nail.  I recommend allowing each layer to dry before applying the next layer.  If you apply the next layer without letting the previous one dry, it gets goopy and pulls the layer underneath which looks messy.


For my accent nail (ring finger), I started off with Butter London's 'Nail Foundation' just to give my nail a clean consistent texture and hide my yellowed nail.  I then used a large dotting tool and Sinful Colors 'Black on Black' to create a couple of simple five-point flower.  I then used a medium dotting to and created an overlapping flower with my purple polish.  I filled in the void spots with small dots using a small dotting tool and the same purple polish.

 
I then performed a little clean up and applied my favorite top coat.  I decided while I was applying my top coat to add some small black rhinestones I had, to the centers of my flowers.


The syrup gradient was incredibly easy, there are only a few pointers I can provide to help make it even easier for you. Its important to apply the polish in thin layers because it starts to get much thicker with each layer you add.  The longer your nails are the more layers that you are likely to apply.  My nails are fairly short and I did four layers, however the more you gap the layers the fewer you will need to do.  Also, It is very important to give each layer ample time to dry.  You might have noticed some weird spots on some of my syrup gradient nails, this is because I did not let the layers dry enough before applying the next.


Before, this Nail That Technique challenge I had no clue what a syrup gradient was, but I am so happy to have figured it out and tried it.  It is so easy to create, and now I know what to do with all those polishes that I have complained were too shear.  I can see many more syrup gradients in my future.  I also like how the sheer base accent nail contrasts the darker nails.  All in all this is a good mani.


I hope you enjoyed this tutorial and will give this a try.  I seriously have not tried a nail art design any easier than this one.  Thanks for stopping by, see you next time.

 
Your Fellow Plebe,


Sweet Cupcake Nail Art

This week's Nail Polish Queens' challenge is cakes.  Since, my daughter turned two today I decided to create cute cartoon cupcakes that I thought she would enjoy.  My little queen in training loves to look at my nails when they are painted.  I love when she grabs my hand and oogles my artwork, often exclaiming "Momma, look at the pretties!"  Though I don't want her to grow up too fast, I can't wait till she can enjoy the process of creating nail art as much as I do.


I started of this design with Ciate 'Boom Box' on my thumb and pinky, along with Sinful Colors 'Snow Me White' on my mid finger.  I left my pointer and ring bare except for a base coat, but I'll be adding the cupcakes next.


To create the cupcakes, I freehanded a French tip with Ciate 'Kiss Chase'.  You could tape your tip off if you prefer, but since the edge is going to be covered I decided to use this as an opportunity to practice.  Using a striping brush and my blue polish, I created stripes on my tip to decorate my cupcake liner.  Next, I used a medium dotting tool and white polish to create the frosting edge of my cupcake along the top of the French tip.  Using the applicator brush of my white polish I added the top of the cupcake.  I then used a large dotting tool and Ciate 'Mistress' to dot a cherry on top.  You can stop there if you want simple cupcakes, but I went a head and used black polish (Sinful Colors 'Black on Black') to create a happy face.


On my mid finger I freehand the phrase 'You're so sweet' using a thin brush that I trimmed down to make even thinner, with my blue polish.  I choose this phrase versus 'Happy Birthday' because my daughter is sweeter than any cupcake, plus this is more universal.


I performed a little clean up and added a top coat.  These are a big hit with my little munchkin, I hope you enjoyed them too.  Thanks for stopping by, see you next time.

 
Your Fellow Plebe,


Essie's Cashmere Matte Collection Swatches and Review

Today, is an incredibly cold day here in New York.  We are experiencing record low temperatures and incredibly strong winds.  So, what better to share with you than Essie's Cashmere Matte Collection.


All the swatches you are about to see are applied in 2-3 coats.  Of course, they do not have a top coat, applying a top coat on a matte finish polish kind of defeats the purpose of it being matte. 

Wrap Me Up


This is a perfect off white.  Even though it is a white shade it is still very warm and inviting.  I love this color with the matte finish.


All Eyes on Nudes


This tan nude shade is a great polish for those of you who are not allowed to wear bright or overpowering polishes at work.  I personally don't find this shade very exciting, but I feel it rounds out the collection nicely.


Just Stitched


This soft pink shade is just to sweet.  The iridescent shimmer gives it so much color.  Some how this color is both subtle, yet still manages to be an eye catcher.  The matte with iridescent shimmer are beautifully unique.


Comfy in Cashmere


This is a very interesting purple grey shade.  For me this is a unique color, I don't think I own anything like it.  This too, has an iridescent shimmer that makes it incredibly beautiful.


Coat Couture


This falls in the same family as Comfy in Cashmere but is more purple and a little cooler in tone.  I tend to avoid purple shades, I don't feel they compliment my skin tone well.  However, I wore this shade all weekend and I really liked it.  The rich tone, matte, and iridescent combo makes this a shade worth wearing.


Spun in Lux


The name of this shade is fitting because this color is so luxurious.  Though in some light this appears to be nearly black, it is a very dark navy blue.  It was mostly opaque with one coat, but I did two for good measure.  This is my favorite color of the collection, I can't help but to drool over this dark color and iridescent shimmer.


For those of you who do not have any experiences with matte polish, it does dry relatively quickly.  This is mostly a benefit but for those of you that paint slowly you may experiences streaks because of how quickly it dries.  Also, if you have heavily ridged nails you may want to use a ridge filler base.  I did not use a ridge filler, and though you can't see it in the pictures I could notice some ridges through the polish.

Matte polishes are all the craze right now but this collection kicked it up a notch with excellent colors most of which have a beautiful shimmer.  If you like soft colors or neutral shades this is a great collection.  If you work in an environment with a dress code that does not allow bright polishes or overpowering nail art this is a perfect collection for a professional person.

I hope you enjoyed these swatches (Yay! I finally got a macro lens, what did you think of the macro pics?) and found the review useful.  Thanks for stopping by, I hope you are staying warm, see you next time.

Your Fellow Plebe,


Nails Art Proudly Powered by Blogger