Painted Easter Eggs & Chick

Hello Chickies!  With Easter right around the corner I thought it would be fitting to create some fun Easter egg nails.  As a child, one of my favorite Easter activities was dying and decorating eggs.  As an adult Easter egg nails are the next best thing.  This is what I created...


Materials I used:
Base coat - Seche Vite
Bright pastel polishes, these are the majority of Lucky Lacquer Fleur Series including: 'Alpine Phlox,' 'Sweet Pea,' 'Fleur Rose,' 'Forget Me Not,' 'Teal We Meet Again,' 'Spring Charm,' 'Dahlia,' and 'Lavender.' If you would like to see swatches of these, check them out here.
Yellow polish - China Glaze 'Metro Pollen-tin'
Black, White, and Orange nail art stripers
Straight and chevron nail vinyls from nailvinyls.com
Dotting tool
Top coat - Seche Vite


I started this design out by painting three wide horizontal stripes on all my nails except for my ring finger, using various combinations of my bright pastels.  I wasn't very concerned about the stripes being perfect because much of this will be covered up. On my ring finger, I simply painted it yellow, for the Easter chick.  I did apply a quick drying top coat to speed up the drying time.


When my polish was dry I began my designs.  For the chick I simply applied two chevron vinyls horizontally at the top and bottom of my nail.  I filled in above and below the vinyl with white polish from a nail art striper and immediately removed the vinyls.  I then drew in a simple chick face using an orange nail art striper I drew a V-shape almost heart-like beak, and with black polish from a nail art striper and a dotting tool I placed two little beady eyes.


For the painted Easter eggs I alternated chevron and straight vinyls, keeping them with in the previously painted horizontal stripes.  I then choose a third color and painted over top of the entire nail.  I immediately removed my vinyls, exposing the colored stripes below.  I finished off the painted egg design by picking a fourth color and with a dotting tool filling in some area with decorative dots.


I alternated patterns with chevron, straight, chevron and patterns of straight, chevron, straight just to change it up a bit.  I didn't pre-plan my color patterns but just went with what seemed right as I was going along.  This is pretty much how I decorated eggs as a child.  I finished up with a final clean up and application of top coat.


This is a really cute and fun Easter design.  If you don't have vinyls you could cut tapes or even draw this freehand, however, the vinyls make it much quicker and easier to create.  I really like the way these turned out with some many fun combinations.  I'm having a hard time deciding which is my favorite, which one do you like the most?  I hope you enjoyed this Easter inspired nail art design, as a warning the majority (if not all) of my nail art designs planned this week are Easter inspired.  Thanks for hopping by, see you next time.

Your Fellow Plebe,


Read Between the Lines

Hello darlings!  With this nail art design, I am finally caught up on my #nailthattechnique Instagram challenges.  Hooray!  And with only one more week left to go (for this month, anyways).  This week's #nailthattechnique challenge is Newspaper Print.  I have created a newsprint transfer design once before, and because I didn't think it was all that difficult I wanted to do a something a little more with this newsprint design.  This is what I came up with...


Materials used:
Base coat - Seche Vite
White Polish - Color Club 'On Cloud Nine'
Red Polish - Color Club 'Red-Handed'
Grey Polish - Color Club 'Tall, Dark, & Handsome'
Pink Polish - Color Club 'Seal it With a Kiss'
Rubbing alcohol
Newspaper clippings
Striping tape
Top Coat - Rica 'Glossy Glam'

I started out with two clean coats of white polish.  I think Color Club's 'On Cloud Nine' has a beautiful clean look to it.  I allowed this to dry till it was set, approximately 30 minutes before proceeding to the next step.


When my base polish was dry, I did the newsprint transfer.  This is fairly easy to do, and doesn't require anything too elaborate.  Clip pieces of newspaper with a sufficient amount of print on them to a size slightly larger than your nail.  Soak the clipping in rubbing alcohol for about 20-30 seconds (I used the bottle cap of my rubbing alcohol as a little bowl).  I used 91% isopropyl rubbing alcohol, you can find this in any department or drugstore.  Then place the print side down onto the nail and apply pressure.  I found the more pressure I applied the darker my print appeared on my nail.  This is why its important for your base color to be completely dry before performing this step.


I repeated this process on all my nails and applied a quick drying top coat.


Though I like the look of these simple newsprint nails I decided to take them one step further.  When they were dry I used striping tape, and applied various width stripes horizontally across my nails.  Primarily leaving the printed text areas exposed.


With my tapes in place I alternated with red, pink, and grey filling in random stripes.  I peeled the tape immediately after an area was painted to prevent as much pulling as possible.


I performed the necessary clean up and applied a final layer of top coat, and that is how I created what I am titling Read Between the Lines nail art design.


As a side note, you may notice some color streaking on these nails.  Sadly, that is due the top coat application.  I thought this was because I was applying the top coat too soon and not allowing the polish to dry enough before top coat application.  However, I have used Rica 'Glossy Glam' top coat on the last few nail art designs, and it seems no matter how long I wait this has been occurring.  Also, I noticed with this nail art design that after it had time to cure (dry completely) that there was a severe amount of shrinkage.


I snapped the above picture, about 12 hours after application and you can see at the tips and smile lines that the polish has shrank back from their original placement.  I do cap my tips (paint the free edge of nail) both with polish and top coat when doing my nails, but this still occurred.  I commonly use Seche Vite for my top coat, and I have heard people complain about it shrinking.  I've even had Seche Vite shrink on me but usually only with older bottles that have become thick and goopy.  This is the worst case of shrinkage I have ever come across.

I really like the glossy shine of Rica's 'Glossy Glam' top coat and it dries fairly quickly, but it doesn't seem to be a good fit for layered nail art designs.  I think in the future, I will use Rica's top coat for basic polish designs or very simple (single layer) nail art designs.


Though this design had a few hiccups and the execution of it turned out poor, I still like the concept and color choices.  I think I'll try this again in the future using a top coat I know will work better for this many layer.  I hope you like this design (even if it's not perfect).  Thanks for stopping by, see you next time.

Your Fellow Plebe,


Wear Yellow for Seth

Today, people around the globe are sporting yellow for a wonderful five year old Seth.  Seth has severe combine immunodeficiency (SCID), which many now as bubble boy disease.  This brave little guy has already had one bone marrow transplant and will be getting a second transplant.  This super guy has asked everyone to wear his favorite color for him on this day March 27, 2015 to show their support.

I decided to create a yellow nail art design in honor of Seth...


I started off with one coat of Sally Hansen Triple Shine 'Lemon Shark' over one coat of Sinful Colors 'Snow Me White.'  I applied the yellow over white to make it brighter.


I then used Pureen image plate 16 and 03 to stamp heart shape images on my ring and pointer finger. I used black stamping polish and rectangle stamper from bornprettystore.com.  I choose heart images because Seth has captured the hearts of so many around the globe, including myself.


I also hand painted a small black heart on my thumb, mid, and pinky fingers too.


I hope you are all wearing yellow for Seth today.  It's such a simple request, that will really bright this boys day.  If you would like to know more about Seth and his journey, checkout their family blog: Our Little Hero.  Don't forget to post your yellow pictures with #WearYellowForSeth on Facebook, Instagram, or Twitter.  Thanks for stopping by, see you next time.


Your Fellow Plebe,


Guest Post on Spark of Allure - Easter Inspired Nail Art

Hello Beauties!  I recently had the wonderful opportunity to create an Easter inspired nail art for a guest spot on the wonderful Spark of Allure blog.  It is live on the blog right now: http://www.sparkofallure.com/2015/03/easter-inspired-nail-art/
 
 
Hop on over to her blog for the full details and a tutorial on how to create this cute 3D Plaid and Easter Bunny design.  While you are there checkout her blog, she has something for everyone.  Spark of Allure has articles on useful beauty tips, product reviews, nail art, pointers for every day life, fun DIY projects, and so much more.  So what are you waiting for...go check it out.
 
Your Fellow Plebe,


Indie Bunny Box Part 2 - Swatches, Swatches, and More Swatches

Hello Darlings!  Sorry for the delay but here is Part 2 of my review of the Indie Bunny Mani Box, I received last week.  If you missed Part One scroll down the page (or click the link highlighted).  This box has so many goodies in it that I had to break it down into two post, in one word this box is EPIC!

Here is a glimpse of what I will be showing you today...


To save from a great deal of redundancy I'll precursor the following swatches and let you know that each set includes a sunlight and lamplight pictures.  In all the sets the sunlight picture is on the left and the lamplight picture is on the right.  All macros are lamplight, as well.  All of these polishes are swatched without a top coat except one which I will point out when we get to that one.  Also instead of burying the links for each indie makers store in the text, I am including links to all the indie makers that contributed to this box set at the very end of this post.  Hopefully, this will make it easier for you to go and visit their shops.  Now without further adieu here are the gorgeous Easter themed lovelies...

6 Harts Polish 'Blue Eyed Bunny'


As always I'm a sucker for any blue polish and this one is no exception.  This gorgeous steely pastel blue polish is an awesome jelly full of sparkly micro glitter.  Shown here in three coats, it is still a bit translucent.  I think this would be a great polish for layering.  Of course, it is very beautiful on its own too!


Paint Box Polish "Marshmallow Peeps'


I was a bit surprised because I expected more yellow polishes in this box set.  I think its because for me yellow is the signature color of Easter.  Almost every Easter dress I wore as a child was some shade of yellow or included yellow.  So, thank you Paint Box for making this beautiful shade that took me down memory lane.  This gorgeous pastel yellow, is full of white silvery flakies that was very difficult to capture on camera.  The flakies gives it a shimmery affect that takes this polish over the top.  You can see the silvery flakies better in the macro shots below. For a yellow polish this was very opaque, however this is swatched in 3 coats, because the polish was a little thicker than I'm used to and I was having difficulty with streaks.  I probably should have allowed more drying time between coats.


Above the Curve 'Rockin Robin'


This is one of my favorites in the box set.  This polish is a perfect robin's egg blue, with darker blue flecks and just a bit of holographic shimmer.  For me, this is perfect in every way, perfect color, perfect finish, perfect name.  I love it!  Shown here in two coats, with a super smooth shine finish even without any top coat.


Alter Ego 'Chocolates Bunny'


This is truly one of the more unique polishes of the set.  This is an awesomely opaque chocolate brown polish full of gold shimmer.  Shown in two coats, this lovely polish dries to a satiny matte finish.


However, if satin matte finishes aren't your thing they included their 'She Shines' topcoat.  This gives the polish a beautiful shine and dries pretty quickly too.


Smokey Mountain Lacquers 'Eggstra Special'


This polish is truly Eggstra Special, I love the puny names.  This polish is an awesome medium blue crelly with fun matte glitter pieces.  There are yellow hexes, purple squares, and larger pink circles.  However, I couldn't get any of the circles out and on my nails, but you can see them in the bottle shots.  I'm still really new to crelly glitters, this being my second one ever so I'm still figuring out the best way to apply them.  I did place the bottle upside down overnight, in an attempt to get the glitters to sink to the top but it didn't seem to help me much.  I still love the color of this polish (it being blue and all).  Shown here in two coats.


Finger Lickin Lacquer 'Rockin Robin'


First off, I love the name of this brand and the labeling is spot on.  Second, this polish surprised me.  Have you ever seen an outfit on a mannequin and thought that's pretty but there's no way it'll look good on me.  Then you try it on and you find out, it's actually perfect for you.  This polish was that outfit for me, lol!  When I first saw it I thought this is really unique and pretty, but it probably won't look good against my fair skin, but it turns out it looks awesome on me and I absolutely love it.  In the bottle it appears to be a fuchsia like color, but because it is a jelly polish it actually appears more pink against my skin.  This incredible jelly polish is full of small and medium bright blue hexes and there is just a hint of sparkle too!  Shown here in two coats.  I am seriously in love!!!


Firecracker Lacquer 'Purple Peep-le Eater'


This is a very fun crelly, right here.  The entire time I was swatching this, and even now I can't stop singing the song 'One-eyed, one-horn, flying purple peep-le eater!'.  This awesomely bright lilac purple cream glitter is full of matte white and yellow hexes, medium dark purple shiny hexes and little bits of sparkle.  Perfect with just two coats.


Sweet Heart Polish 'Peach Cobbler' & 'Sprinkles!'


'Peach Cobbler' is an absolutely beautiful cream polish.  It is a pale peachy pink, and as much as I hate to admit it (because I claim not to like pink shades) this looks amazing on me (or at least I think so).  Swatched here in three thin coats, it is incredible! 


Sweet Heart Polish also included this fun packed clear base glitter topper, 'Sprinkles!' which pairs up with Peach cobbler perfectly.  It looks like a party in a bottle, with too many shapes and colors for me to name here.  I really love how it goes with 'Peach Cobbler'.

Blue-Eyed Girl Lacquers 'Queen Lime Rose Zinnia'


I believe green polishes are the most under-rated polish shades of all.  This absolutely gorgeous polish is a perfectly opaque pastel green with a beautiful pink shimmer.  I fear my pictures just don't do this polish true justice, it is so incredibly pretty.  Shown here in two coats, and look how shiny it is without a top coat.


Philly Loves Lacquer 'Wooder Ice'


This is by far one of the most unique polishes I have ever seen.  This is a super fun pastel matte micro glitter polish with bits of sparkle glitter too! I could find, minty green, pale yellow, pastel blue, and I think a very pale pink color glitter too.  This is very opaque for a glitter polish, you can get full coverage in two to three coats, shown here with just two.


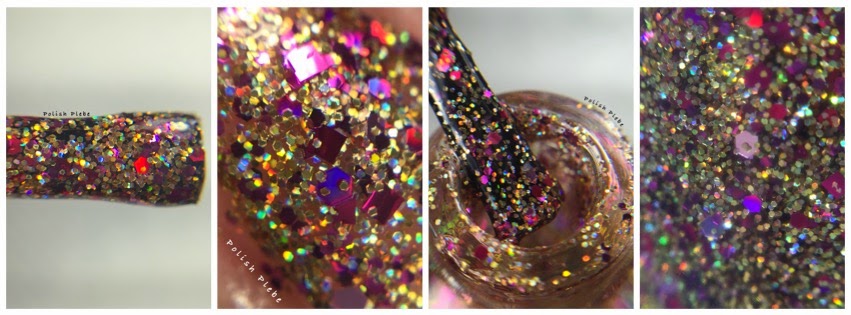
Ellagee 'Jeweled Egg Hunt'


I saved this one for last because I feel this is the true gem of this box set (not that all the others aren't gorgeous because they are).  This is so pretty, it was difficult to look away from, and I just love the little bunny bling she put on the bottle too!  This glitter polish has a smoky clear base full of small holographic gold glitter, small dark burgundy pieces, larger holographic burgundy hexes and squares, and a sprinkling of rose pink pieces too.  Shown here in three coats without any base color.  I think this would look really stunning over a burgundy or gold polish.


Final Thoughts


I am so glad I was able to get my hands on this wonderfully festive collaboration set.  It was a great way from me to get to know the products of some great indie makers and try things I never even knew I needed.  Even though I originally balked at the price $80 including shipping and handling, I now realize this was a tremendous bargain.  Considering that the average price of an indie polish is anywhere between $8-$15 this is really a steal.  Especially, since all the products are phenomenal.  There is not one product I was disappointed by and I will definitely be ordering from these makers again in the future.

If you read the previous post, Part 1, you know this was a very limited edition set that sold out relatively quickly.  However, I did hear through the Instagram grapevine that there are four (yes only four) remaining box sets that Ellagee will be selling this Saturday at 4pm CST.  Remember this set previously sold out in about six minutes the last time it was listed, so if you really want this, set an alarm and be ready and waiting at your computer to order this. 

If you are unable to get the box set, I still highly recommend you check out the other products these wonderful indie makers have to offer.  Some of these products from this box set are available for individual sale, and if not they have a great many other lovely polishes to choose from.  I know because I have been ogling all their pretty polishes for the past week.  Know I'm having a hard time deciding who I'm going to order from first.  I know that if they do another collaboration that I'm going to jump on it in a heartbeat!

I hope you enjoyed all these beautiful swatches and found the reviews helpful.  I'm curious if any of you have tried any of these products?  If you haven't tried any of these brands, who did you find the most appealing?  Comment below, I would love to hear from you.  It might help me decide who I'm going to purchase from first.  Thank you for stopping by, see you next time.

Your Fellow Plebe,


Ellagee
6 Harts Polish
Paint Box Polish
Above the Curve
Alter Ego
Smokey Mountain Lacquers
Finger Lickin' Lacquer
Firecracker Lacquer
Sweet Heart Polish
Blue-Eyed Girl Lacquer
Philly Loves Lacquer
Digital Nails
Gothic Gala Lacquers
Monster Polish
Rica


Nails Art Proudly Powered by Blogger