Neon Love

Hello Lovelies!  Today, I have a mini review and reverse stamping design for you.  For one of the recent giveaway winnings I won, I was allowed to pick a polish of my choice from Baroness X Nail Lacquer.  I have never tried Baroness X and was having a really hard time choosing just one of their polishes because they are all very pretty.  I finally settled on 'Santa Monica Mint' because I own nothing like it, and thought it would be a nice addition to my overall collection.  When I received this polish I immediately fell in love, so I ended up creating this design using it as a base.


Materials I used:
Superchick Lacquer 'Bring it On' basecoat
Baroness X 'Santa Monica Mint'
Pueen image plate 01
Mundo de Unas 'Pastel Pink' stamping polish
Fabur Nails XL squish stamper and scraper
Pretty & Polished 'Cosmopolitan'
Small dotting tool or brush
Superchick Lacquer 'Marvel' topcoat

The base coat of Baroness X 'Santa Monica Mint' applied so smoothly and was easily opaque in two coats.  Can you believe, that there are no white undies under this pastel neon green?!  Hard to believe, I know, but it's true!


There are a couple of features the Baroness X bottle had too that I thought were worth mentioning.  One is this nice little button swatch on the top of the handle.  I know many people keep their polishes in helmers or drawers, this feature makes it easier to see the colors without having to pick it out of a drawer.  I also appreciated the nice wide applicator brush, this brush was wide enough that I could paint an entire nail in just two strokes.  I love anything that speeds up the polishing process.


Because I was so in love with this neon, I thought it might be fun to stamp a heart image over top of it.  I found a heart image that I liked on Pueen Image plate 01, and decided to practice some reverse stamping.  I believe this is only my second time reverse stamping and the first time with my newer stamping supplies.

Reverse stamping, for those who are unfamiliar, is the process of creating a decal using a stamped image.  This technique is great for those who are having trouble mastering stamping, or if you want to create a more intricate image with more colors.  I decided to keep this a little simple, I did fill in some of the hearts but I have seen artist create some really phenomenal art with this technique.

The process is not tremendously difficult and with some practice can be mastered.  Start by picking up an image on a stamper.  Instead of transferring the image onto a nail, leave it on the stamper.  Using a secondary polish, and a small dotting tool or brush fill in areas of the image that are voided.  For my image I filled in the open hearts.  Then apply a quick drying topcoat over the complete image.  When the topcoat is dry, use a pair of tweezers to peal the image off the stamper.  With wet polish on the nail (either a second coat of base color, or a clear coat), place the stamped decal.  Very gently tap the decal down, do not put to much pressure because you may tear the decal.


Use cuticle scissors or nail clippers to trim the excess decal away.  Then finish up using acetone and a brush to carefully remove whatever excess decal remains.  After cleanup is complete, apply a final layer of quick drying topcoat.  I went ahead and added an individual heart on the corner of my pointer to complete this look.


I had a few minor issues with this but all in all I love the way this turned out, the pink and green really complement one another.  This is also one of those rare times when my cindy hand turned out better than my swatch hand.


After, I completed this nail art design I decided even thought this green is beautiful that it was a bit distracting.  To tone it down just a little bit, I changed the pinky and thumb to the secondary dark pink that I used in the stamped image, Pretty & Polished 'Cosmopolitan.'

 
I feel by changing a couple fingers to a darker but still bright color and a different texture, helped to balance the neon crème.


Pretty & Polished 'Cosmopolitan,' is a very deep berry pink that has a slight texture to it.  It was almost completely opaque in one coat, but I used two coats to be certain.  It has a beautiful purple pink holo glitter in it that makes it very pretty and unique.


I love neon cremes, I love reverse stamping (now that I've figured out stamping), and I love this nail art design.  It was also really interesting to see how changing a couple of fingers to a different color and/or texture changes the entire look of the design too.  I'm curious which combination do you like the best, neon green alone or the neon green/pink combo?  Whichever, is your favorite I hope you enjoyed this nail art design, and tutorial.  Thanks for stopping by, see you next time.

Your Fellow Plebe,


My Nails Did Skyline Vinyls

Hello Lovelies!  If you follow me on Instagram or you are part of the G+ Community, Nail Art Nation, you know that I have been very lucky lately.  Recently, I was the first to correctly guess what My Nails Did newest vinyl series was going to be and won a set of said series.  The new vinyls are City Skylines.  Shawna sent me a set that includes: London, Chicago, Toronto, Seattle, and NYC.

I decided to peal off the black boarder for two reasons, one so you could get a better view of the vinyls, and two to perform what I like to call a peal test.  These vinyls have so much detail, with lots of little crevices.  I was a bit concerned that they might not peal well, for that very reason.  I started out very slowly, expecting a piece to get stuck between buildings or to rip off the top of the tower.  I was pleasantly surprised that the backing pealed so smoothly and so easily, without a single problem.

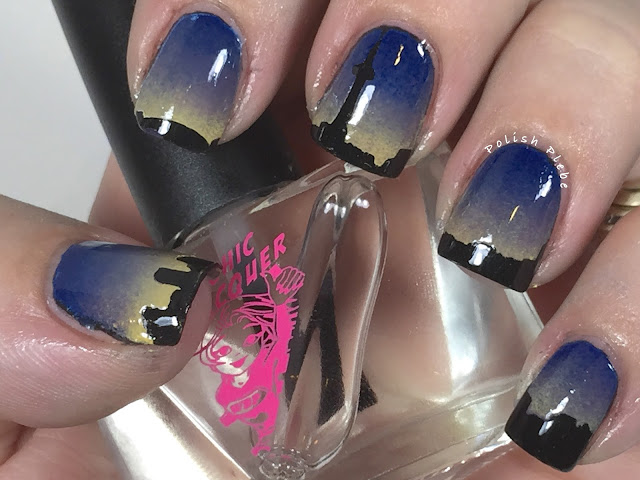
I decided to test these out using the Toronto skyline for this tutorial and review, because it is a place I've always wanted to visit.  It's sad, I've lived the majority of my life in NY and I've never been to Canada.  There are two ways that you can use these vinyls, one way is to use them like a decal, and the second is to use them like a stencil.  I decided to use them as a stencil.

I started off with two coats of Chaotic Glitz 'Little Black Book.'  This was another prize from one of the recent giveaways that I won.  This is a really pretty black that has a holo shimmer to it, if you check my Instagram feed you'll see some macro shots of it that help show off that shimmer.  Also because I am using vinlys I applied a quick drying topcoat.

 
Once, my nails were dry I began applying the vinyls.  Now these vinyls are a little bit trickier to apply than some others because the skyline is one continues scene.  Therefore, you have to divide it amongst your fingers.  I did so by starting on my pinky, I placed it and then trimmed it with a small pair of scissors, and repeated this process across my nails.  However,  I had a slight problem when I got to the CN Tower and had to shift the vinyl slightly to make it fit on my nail.  If I had thought it out properly, I would have started with the placement of the most important building and adjust the others accordingly.  I made it work well enough though.


If you are using the vinyls as a stencil, remember to leave enough of the vinyl hanging off the end or side of the nail so that you can peal it off without disturbing your polish.  I also prepped my fingers with a liquid latex before I got to the messy goodness of the sponged gradient.


I did a sponged gradient of China Glaze 'One Track Mind,' 'All Aboard,' and 'Metro Pollen-tin.'  This may seem like a weird combination but my goal was to create a night time city light scene.  For the very first layer of sponging I applied a white over the three colors because I was sponging over black.  After, the first layer I proceeded with just the three colors and no white.  It took me about four layers of gradient to achieve the desired opacity.


I then pealed off all the vinyls and liquid latex barrier.  As you can see I had a couple oopsies along the edge of some of my nails.  There is also a little bleed over at the base of the CN Tower that happened when I removed the vinyl (hard to  see because of the glare). 


I performed a great deal of clean up some with acetone and a q-tip, and a bit with acetone and a brush.  I also used a small detail brush and fixed the messed up areas.  I also applied a final layer of quick drying topcoat.  I decided to use another of my new goodies Superchick Lacquer 'Marvel' quick drying topcoat.  It dried unbelievably fast, and as you can see is super shiney.  (I also used Superchick's 'Bring it On,' basecoat for this manicure too.)


The city glow turned out just the way I had hoped it would.  I was going to add some stars to the darker areas, but decided against it because I didn't want to take away from the gradient. 


Even though these vinyls require a little more effort during placement, I love the continuous scene.  The quality of the vinyls are excellent, the cuts were absolutely perfect.  I think it is wonderful that Shawna decided to create skylines of actual cities instead of just a generic city skylines, and she has many cities to choose from.  I'm super excited that she sent me a Seattle skyline, because it's one of my favorite cities, and I'm taking a trip there in October.  I'm sure you can guess what I'll be wearing on my nails.  This is my first experience with My Nails Did, and I was very pleased, she has many unique vinyls and you can bet that I'll be purchasing from her in the near future.


Also, if you don't see a city that your interested in send her an email, and she'll work with you to see if she can make it happen.  I hope you enjoyed this nail art design, and found the product review useful.  Thanks for stopping by, see you next time.

Your Fellow Plebe,


Nautical Nonsense

Hello Lovelies!  You've probably noticed I've been posting less and less lately.  I'm finding that I am having difficulty dividing my time between everyday boring responsibilities (boo), enjoying fun summertime activities (yay!), and nail art.  So, I've been putting nail art on the back burner lately so that I can partake in the later two.  However, there are so many summertime nail art designs that I want to accomplish.  To help check off some of the designs I had in mind I decided to create this mish mash nautical themed skittle mani...


I used a wide variety of products for this nail art design, so instead of listing everything here I've decided to include the products used for each nail in the individual tutorials.  So, if you like one particular design just scroll down to that finger and save yourself the time.

After applying my INM ridge free base coat, I applied a half circle of white on my thumb using Color Club 'Blank Canvas,' I also used this on my mid and ring fingers.  Upon my mid and ring fingers I also applied a quick drying topcoat because I used vinyls.  I used Lucky Lacquer 'Forget Me Not' on my pointer and upon my pinky I applied Smokey Mountain Lacquer's 'Fairy Water' from the Christmas in July Indie Collab box.


Beach Ball

Upon my thumb I created a beach ball, I created a very similar design last year using binder reinforcements as a guide (Life's a Beach).  This time I created the design freehand.  I used the applicator brush from the bottle and created a half circle on the tip of my nail.  I then used orange, red, and yellow nail art stripers to draw stripes on my beach ball.  I prefer to start on the sides first, and draw the center stripe in last.  I curved the stripes slightly and made the center stripe bow out in the middle to give the illusion of the ball's roundness.


Island Oasis

On my ring finger, I created my very own island oasis complete with crossing palm trees.  Over my sky blue I painted a small island at the tip of my nail using the applicator brush of China Glaze 'Don't Honk Your Thorn.'  I then created the trunks of the crossing palms using a small detail brush and OPI 'Going My Way or Norway?'  I painted in the palm fronds using a green nail art striper.  I outlined the trunks and added a few pebbles in the sand using 'How Great is Your Dane?' along with a small detail brush and a toothpick.  I finished the scene using Color Club 'Blank Canvas,' and Smokey Mountain Lacquer 'Fairy Water' and sponged the tide line along the edge of my nail.


Friendly Little Whale

On my mid finger, I decided to create a friendly little whale.  I originally intend for him to be part of a coastal scene involving a light house but this will have to do.  Over my white base, I used the wave vinyls I had received from Ochouseofdecals, I placed two vinyls upon my nail.  I painted the upper portion with Lucky Lacquer 'Forget Me Not,' the center wave stripe received Zoya 'Rebel', and the wave on the tip was filled in with Smokey Mountain Lacquer 'Fairy Water.'  I removed the vinyls immediately after polish application.


Next, I freehand painted my little whale friend.  I painted his body and tail using a small detail brush and China Glaze 'Intelligence, Integrity, & Courage.' I then outlined his body, gave him a fin and a blowhole using the same brush and Color Club 'Tall, Dark, & Handsome.'  I used a Art Club Dou pen and gave him an eye and a smile.  Lastly, I created a spray from his blowhole using Color Club 'Blank Canvas' and my small detail brush.


Charming Anchor

This nail design was quite simple, and I did it only because I wanted to use some goodies I received in some recent giveaways I had won.  Using straight vinyls, I used two per stripe to create slightly wide stripes.  I used the same red nail art striper I used to create my beach ball design, and filled in the stripes.  I removed each set of vinyls between stripe applications to prevent pulling.  At this stage I performed a bit of clean up with acetone and a brush, applied a topcoat and immediately applied the anchor charm.  I occasionally glue charms, but I didn't this time because I did not intend to wear this very long.  However, if you want yours to stay on for a substantive amount of time I would recommend using glue, especially for a charm of this size.


Yellow Bikini

Upon, my cute little pinky nail I decided to create my design for this week's Nail Art Nation prompt: Itsy Bitsy Teeny Weenie Yellow Polka Dot Bikini.  I know it doesn't fit the prompt precisely but it does include a yellow bikini and polka dots.  Over my blue base color, I applied small white polka dots using Color Club 'Blank Canvas' and a small dotting tool.  I then used the same dotting tool and yellow from the same nail art striper I used on my thumb, and did my best to fill in the white dots with yellow.  Why did I bother to apply white under the yellow? Well to make the yellow appear brighter over the blue, of course.  I then used a bikini water decal I received as part of the Christmas in July Indie Collab box set and applied it over top.


As per usual I performed a final clean up with acetone and a brush, and applied my favorite topcoat.  I've mentioned this before but it is very important that you float the topcoat to prevent streaks and runs.  This is also important to do over decals, if you look closely on the bikini on my pinky you'll see why its important.


So, there you have it five nail art designs in one.  With so much to do and not enough time to get it all done this funky skittle mani makes up for lost time.  I hope you enjoyed this nautical nonsense creation and found the tutorials useful.  Thanks for sticking around, and thanks for stopping by, see you next time.

Your Fellow Plebe,


Wave Scaled Gradient

Hello Lovelies!  The wonderful Ashley of Ochouseofdecals sent me some really nice wave vinyls for me to try out and I couldn't wait to do this nail art design with them.  This is one of a few ideas I have for these vinyls so keep your eyes open for more ocean scene nail art coming soon.


I really wanted to do a scaled gradient with these vinyls because I felt it was the best way to represent the ever shifting and changing sea.  I also took this opportunity to use a couple of polishes that I haven't gotten to use yet from the Christmas in July Indie Collab box set I purchased last month.


Materials I used:
INM Ridge Free basecoat
Digital Nails 'Follow the Water'
Paint Box Polish 'Polar Bear Club'
Vinyls from Ochouseofdecals (coming to her Etsy shop soon)
Ellagee Lickity Split Latex Mani Mask (for easier clean up)
Makeup sponge
Quick drying topcoat

Start off with one coat of the lightest color to be used in the gradient.  I was pleasantly surprised how opaque Digital Nails 'Follow the Water' was with only one coat.  This polish is fully opaque with 1-2 coats, depending on how thin or thick you like to apply your polish.  I prefer thinner applications, myself.


After prepping your fingers with a latex mask, (if you don't have a latex mask use scotch tape, or a watered down Elmer's glue mix to protect your skin) begin the gradient.  Because this is a scaled gradient concentrated the initial gradient close to the smile line of your nail.  You want to leave enough room on the nail to be able to perform the gradient at least twice. 
 
Once satisfied with the first gradient, apply a quick drying topcoat.  It is essential to use a quick drying topcoat whenever using any vinyls or tape, without it the vinyls will pull the base polish off when removed. 
 
When the first layer is dry apply a vinyl about midway across the nail, you want to have enough of a gradient visible on the top of the nail and enough room to create a nice gradient on the bottom too.  Cover the top area where the completed gradient is either with a latex mask or a piece of tape, to protect it from your next layer of gradient. 
 
Repeat the gradient process on the bottom half of the nail, exactly as you did on the top half.  When satisfied with the opacity and blend, remove all vinyls and latex.
 
 
As almost always perform any necessary cleanup with acetone and a brush and apply a final layer of topcoat to seal in the design and give it a nice shine.
 
 
I love ocean and nautical scenes and these wave decals are perfect for creating such scenes.  Keep an eye on Ochouseofdecals for these vinyls, they should be arriving soon.  She also has a couple other nail vinyls available along with lots of fun vinyl decals great for decorating with.  Here is a macro shot so you can see the wave detail better...
 
 
Also, if you are interested Ellagee still has some Christmas in July box sets left.  It is a really fun indie collab box that is just packed full of pretty polishes (like the two used here,) and nail goodies.  I hope you enjoyed this nail art design and found the tutorial useful.  Thanks for stopping by, see you next time.
 
 
Your Fellow Plebe,
 

Nails Art Proudly Powered by Blogger