Tweed Nail Art

Winter is on its way here in the Northeastern United States for some of us its already here. With temperatures dropping and snowy weather moving in, many of us are looking for ways to stay warm. Heavy coats and sweaters are being brought out of storage and put to good use. I wanted to create a warm and interesting nail art design and what I came up with was this tweed like print.


Materials
Base and top coat (matte optional)
4-5 shades of polish
Stripping brush

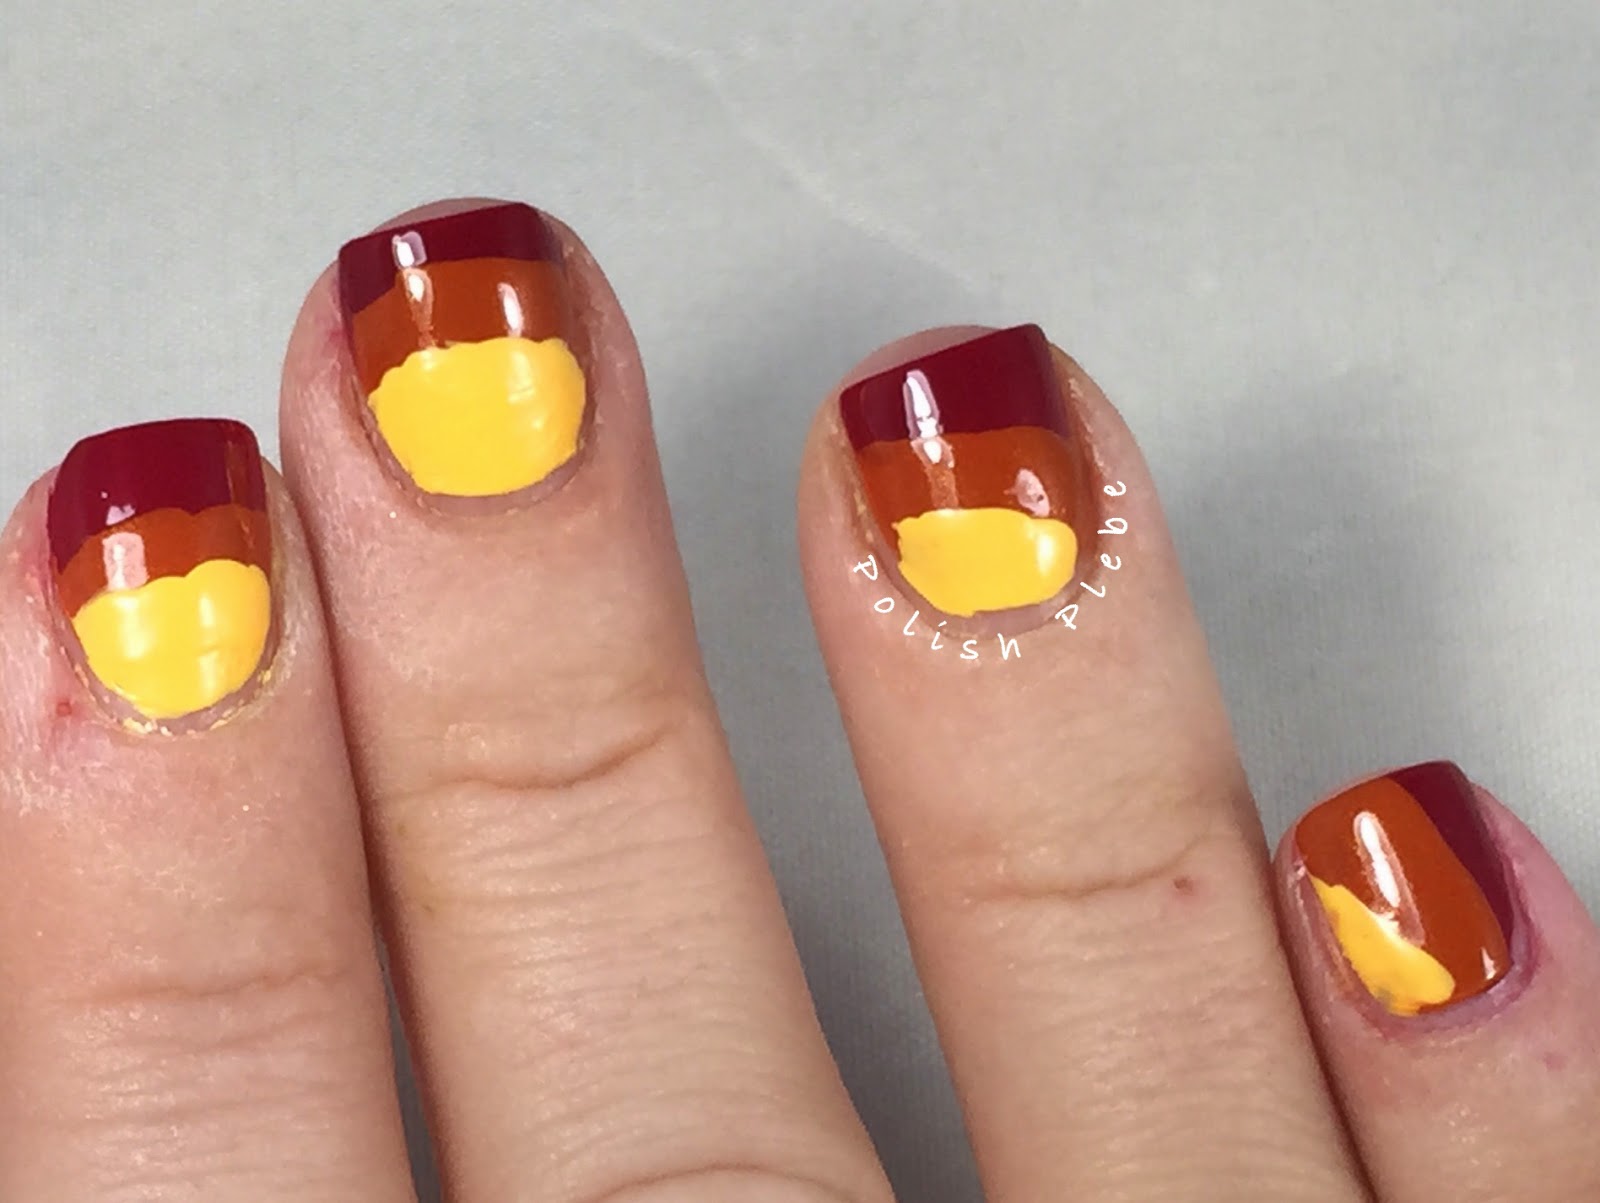
I started with a nude base color, China Glaze 'Don't Honk Your Thorn' from their City Flourish collection. I know I just used this with Monday's design but it'll mostly be covered up by the end of this tutorial anyways.


I then started adding layers using the dry drag method. I do not have pictures of this method but it seems pretty simple to explain. The dry drag method is when you remove as much of the polish from the applicator brush by wiping on the side of the bottle. I also swiped my brush on a paper towel before application.

The first layer of dry drag was China Glaze 'What are You A-Freight of?' from their All Aboard collection. I did not cover the nail completely but did a staggered brick pattern horizontally across the nail. This left some blank space but no worries there are more layers coming.


For the next layer of dry drag I used China Glaze 'Don't Get Derailed' also from the All Aboard collection. I concentrated on filling in the slightly bare areas and brushed vertically this time allowing the layer to overlap the previous one a bit.


Next I added in some tweed stitches, I used China Glaze 'Well Trained' another from the All Aboard collection and a stripping brush to create thin vertical lines and t-shapes.


I repeated the previous step using China Glaze 'Swing Baby', I'm not sure what collection this is from but it's a favorite of mine that I purchased at the beginning of my nail polish addiction.  You'll notice I used all cream colors except this last one. I felt it need a little sparkle but not too much because there are not too many sparkly tweeds out there.


I did my clean up and add a matte top coat. You could of course use a regular top coat of youd like but I feel the matte top coat gives it a slightly more realistic affect.


I'm actually really enjoying this nail art design; it's one of those ones that look better in person than it does in pictures. This is a great fall/winter nail art design, it incredibly easy, perfect for beginners, and I hope you'll try it out. 


Don't forget that it's #whatruwearingwed. Head over to my Facebook page and post your nail art designs there or use the hashtag on your Instagram pictures and tag me in the comments so that I find it easily. Please like and follow me while youre there or follow me by clicking the 'Join this Site' icon on the top right hand side of the screen. You can also follow me through Google+Bloglovin, and/or Pinterest. I hope you are all staying warm and cozy, thanks for stopping by, see you next time. 

Your Fellow Plebe,


Be Thankful...

Thanksgiving is a few days away and the big question that everyone is asking is "What are you thankful for?"  I personally have a great deal to be thankful for, my life is full of wonderful people who are healthy and happy. I am fortunate enough to be able to do the things I enjoy doing and my life is full of opportunities.


One of the many things that I am thankful for is my passion for nail art. It is a creative outlet that I enjoy and I have found new friends through the nail art community. But most of all I am thankful that I am not a turkey (hehehe).

Materials
Base and top coat
Various polishes
Acrylic paint
Various brushes
Dotting tools

On my left hand I started with China Glaze 'Don't Honk Your Thorn'.  This is one of my go to nude polishes, if you follow this blog you've probably seen me use it before.


Then using brown acrylic paint and a small brush I hand painted "Be Thankful" across four fingers. I filled in the brown "Thankful" with orange polish. I used Butter London 'Brick Lane' for my orange polish.


On the thumb of my left hand I painted "You're Not a " with the same brown acrylic paint.


So, my left hand complete, states...


On my right hand I painted a turkey. I started with red and painted the tips of my nails. I used Essie 'Dress to Kilt'.  You can see that I was very concerned about clean lines, evenness, or messy cuticles.


I then applied a row of orange slightly overlapping the red. I again used "Brick Lane".


I completed this with a yellow row filling in the remaining part of the nail. For the yellow I used China Glaze 'Metro Pollen-tin'.  Each row of color are for the turkey's feathers, if you hadn't guessed that already.


I then used a small brush and brown acrylic paint to divide the feather layers.  Again, because they are feathers I wasn't concerned with them being perfect.


Then drew lines vertically to create individual feathers. I also created the body of the turkey on my mid finger.


I completed the turkey with beak, big scared eyes, and a waddle (I think that's what that's called).


So, if you can not think of anything to be thankful for this Thanksgiving at least,be thankful  that you are not a turkey. I wish you all to have a wonderful Thanksgiving filled with friends, family, happiness and joy. I hope you enjoyed this nail art design, (maybe even got a little chuckle out of it), thanks for stopping by, see you next time. 

Your Fellow Plebe,


Studded Negative Space Manicure

I wanted to do something a little different, something outside my comfort zone. Since, negative space manicure are very popular right now, I decided to give it a try. On many of my fingers the design is based on the arrangement of the studs so the steps were done in a slightly unusual manner.

Materials
Base and top coat
French base (optional)
1-2 shades of polish
stripping brush
Studs

I started of with Butter London's 'Nail Foundation'.  I don't typically use a french manicure base, but since I finally have some I decided to go ahead and use it.


I placed studs on my thumb, mid, and pinky.  These studs are item #7277 from bornprettystore.com.  As you can see I used a variety of gold studs and arranged them differently on each nail.


Using China Glaze 'Community' and a thin stripping brush I outlined the studs leaving a gap to create my negative space.
 \


I then used Butter London 'All Hail the Queen,' one of my new favorites polishes, to fill in the positive space.


I also added some studs to my pointer and ring finger, these studs are item #12411 also from bornprettystore.com.


I touched up my border lines between my negative and positive space (the dark brown line).  I then performed some clean up, and added a top coat to seal in the design and help contain the studs.


I really like the gold studs I used in this manicure. If you purchase from bornprettystore.comuse coupon code: CREATEX31 for 10% off your next purchase.  I enjoyed this nail art design much more than I though I would.  I hope you enjoyed this manicure too.  Thanks for stopping by, see you next time. 

Your Fellow Plebe,


Polar Express Inspired Nails

I am so excited to share this weeks #whatruwearingwed nail art design. Today my husband and I are taking our 22 month old daughter on The Polar Express train ride. I know it's a little early for Christmas stuff especially since Thanksgiving hasn't happened yet but we couldn't wait. This ride is very popular here and if you don't get tickets early you don't get them at all. So for my nails today I did some simple Polar Express inspired nails.


I started with a China Glaze 'New Birth' from the Giver Collection.


I then did a sponged gradient using China Glaze 'New Birth', 'Five Rules', and 'Intelligence, Integrity, & Courage' all from the Giver Collection.


I then hand painted the word "Believe" across three of my fingers and painted a jingle bell on the fourth. I used Revlon 'Emerald' for the green, Anise 'Gold Nugget' for the gold, China Glaze' 'Seeing Red', and a little bit of Sinful Colors 'Black on Black'.  I repeated this on my left hand but changed the order starting at the pinky and working across to my pointer.


I am so excited about our trip today and can't wait for the Holidays to get into full swing. I hope you enjoyed this #whatruweaingwed nail art design and I hope you'll share your current manicure. Head over to my Facebook page and post your nails there or use the mentioned hashtag on Instagram. Be sure to like/follow me while you're there. You can also follow me through Google+Bloglovin, and/or Pinterest. Thanks for stopping by, see you next time. 

Your Fellow Plebe,


Quatrefoil Nail Art

I have been wanting to try this design for a long time but was intimidated by it because it looks so difficult. I finally went ahead and gave it a try. It his is a recreation of Instagramer @mrswhite8907 for a giveaway she is hosting. I wanted to share this with you because it is much easier than it appears to be.


Materials
Base and top coat
Two shades of polish
Dotting tools
Stripping brush

I decided to use Sinful Colors 'Black on Black' and Color Club 'Antiquated'. You really can use any color combination you'd like but I would recommend that you use two colors that contrast heavily so that the design stands out more.


I created my quatrefoil over the gold. Using a small/medium dotting tool, create a four-point flower near the cuticle. Fill the nail with four-point flowers each one touching.


Next, use a stripping brush and draw a thin line extending from the corners of the petals.


For the final step use a slightly smaller dotting tool than the previous one used. Along with the base color dot a flower directly over the previous four-point flower leaving a border of the older dotted color showing.


There you have it, a quatrefoil design. It really is quite easy and just oh so elegant. I really love this design the black and gold are very striking. I hope you like this design and will give it a try if you haven't already. Thank you for stopping by, see you next time.

Your Fellow Plebe,


Large Argyle Print Nail Art

I love argyle prints! They're perfect for fall and are easy to create. You can freehand this design or you can use tape or vinyls to create this look. I decided to use blues and do a monochromatic scheme. Here is how I created my large argyle print:


Materials
Base and top coat
3 shades of polish
90 degree vinyls (or tape)
Striping brush

I started my argyle print with a white base. I used my go to white polish, Sinful Colors 'Snow Me White'. I then applied a quick drying top coat to speed up drying time.


Once my polish was dry I applied two right angle vinyls in a v-shape with the points centered on the nail. I purchased my nail vinyls from nailvinyls.com.  I then painted a light blue on the sides of the nail and removed the vinyls. This light blue polish is Lucky Lacquer 'Forget Me Not'.


Then using a stripping brush and a darker shade of blue I created a dotted diamond shape to complete the argyle print. I used Lucky Lacquer 'Teal We Meet Again' for my darker shade.


I finished this manicure using 'Teal We Meet Again' on my other fingers. Because I love these colors and the argyle print so much I decided to draw a little heart on my pointer. I used Lucky Lacquer 'Sweet Pea' for the heart.  If you love these lacquers check out Lucky Lacquer's store http://luckylacquer.storenvy.com/ and use coupon code: Crystal for 10% off your purchase.  She is running some great Holiday promotions as well as offering gift sets perfect for any lacquer lover.


I absolutely adore this design and I hope you do to. It's fairly easy and can be customized in many different ways. There is a good chance I'll be creating this design again with a different color combination. Thank you for stopping by, see you next time. 


Your Fellow Plebe,


Nails Art Proudly Powered by Blogger