Fall Swirly Gigs

Hello Lovelies!  I hope you all had a wonderful weekend and start of the week so far.  I had a wonderful weekend, I got to enjoy some time with my best friend who I don't get to see often enough.  I didn't have much time for nail stuff because I was out of town, but I did wear these nails over the weekend...


I actually created these nails for this week's Nail Art Nation prompt: Autumn Equinox.  Plus I wanted to use some polishes and vinyls I purchased recently.  I love fall, and fall colors, this season for me is never long enough and is just a whirlwind of activities.  So, I chose these colors and the swirly gigs to represent fall.

Materials I used:
Basecoat - SuperChic Lacquer "Bring It On!"
Polishes - Frenzy Polish "Penny! Penny! Penny!" & "If You Don't Fight You Die" (both from the TV Frenzy Collection)
Swirl Vinyls from Lou it Yourself
Small dotting tool
Topcoat - SuperChic Lacquer "Marvel"

I started off with two coats of "Penny! Penny! Penny!" which is inspired by The Big Bang Theory.  I have never seen this show but I had to have this polish when I saw it.  I topped this with a quick drying topcoat. (Please excuse the misshapen mid finger, I'm having a bad nail week.)


Once the base color was dry, I placed two of the smallest swirly gigs on my ring finger.  I then applied two coats of "If You Don't Fight You Die" based on my favorite TV show, Walking Dead.  I immediately removed the vinyls, because the secondary polish is matte it dries very quickly so it was important not to leave the vinyls on too long.  I finished off the accent by dotting tiny dots around the outside of the swirls in my primary color with a very small dotting tool.


I did a little clean up with gentle acetone and a brush, however I did not apply another layer of glossy topcoat like I normally do, I wanted to keep the two different finishes.


This is a very simple, but (for me) a very accurate interpretation of Autumn.  I love the colors and the contrasting finishes.  Both of these polishes are gorgeous on their own but they also make a good team.


I hope you are enjoying fall (for those of you who get to experience it) so far, and I hope you enjoyed this nail art design.  Thank you for stopping by, see you next time.

Your Fellow Plebe,


Poppin Bow

Hello Lovelies!  It has been a long while since I have done any kind of freehand nail art, so I decided to do a little.  I decided to make it a bit retro, because it's been a while since I've done anything retro too.


Materials I used:
Basecoat - SuperChic Lacquer "Bring It On!"
Polishes - Color Club "On Cloud Nine," "Sweet Getaway," "Je T'Aime," "Jitters," & Sinful Colors "Black on Black"
Small brush
Small dotting tool
Topcoat - SuperChic Lacquer "Marvel"

I began with a white base color on my pointer, mid, and ring fingers.  This is two coats of Color Club "On Cloud Nine," which smells like white chocolate.


Using a small brush I filled in the shape of a large bow on my mid finger and a stripe on both my pointer and ring fingers.  I used Color Club "Sweet Getaway," for the bow, it smells like roses.


I used a lighter pink to outline and add details to the bow and the stripes.  I did have to go back over some areas with white because I made some lines too thick.


Using a small dotting tool and black polish, I filled in the areas around the bows and stripes with polka dots.


For my thumb I did a simple black, and add a glitter to my pinky for a little bit of sparkle.  As usual I performed a bit of cuticle clean up with gentle acetone and a brush, and applied a glossy topcoat.


I repeated this on my right hand as well.  Unfortunately, my non-dominant hand is so out of practice, however I feel it turned out reasonably well.


There is something I really like about a black, white, and pink color scheme, and of course, I just love retro designs too.  So, all in all I am pretty pleased with this look.


However, I do feel my freehand needs a bit of work.  I was hoping freehand painting was going to be more like riding a bike.  You know one of those things you can pick up and do with ease, even if you haven't done it for a while.  Unfortunately that doesn't seem to be the case for me.


Either way, I hope you enjoyed this retro-ish nail art design.  Thanks for stopping by, see you next time.

Your Fellow Plebe,


Geometric Confetti

Hello Lovelies!  I decided before I get to deep into fall color and nail art that I would do something a little lighter and brighter.  These are what I am referring to as Geometric Confetti nails...


Materials I used:
Basecoat - SuperChic Lacquer "Bring It On!"
Base Color - Mango Bunny "Baby Cakes"
Shape Polishes - China Glaze "In a Lily Bit," "One Track Mind," & "Capacity to See Beyond"
Uber Chic Beauty Mat
Scissors and Heart-shaped hole punch
Topcoat - SuperChic Lacquer "Marvel"

Originally, when I was planning this nail art design I was just going to hand paint the shapes over my base color.  After, I got my new mat, I decided to go a different route.  To create this nail art design, I first painted three rectangles of polish on the mat.  (Of course, if you do not have an Uber Chic mat, a plastic bag works equally well for this.)  Once it was dry I peeled it from the mat, and cut it into various shapes and sizes with scissors and a heart-shaped hole punch.  I then applied two coats of polish on my nails and placed the shapes randomly onto the wet polish.


I repeated this process on all my nails.  I had a few problem areas that occurred when I tried to remove the access shape from the nail.


I touched up the problem areas using a small detail brush and the appropriate polish.


I finished off this nail art design like I typically do by performing a close clean up with gentle acetone and a brush, and topped of the design with a glossy topcoat.  A topcoat for a design such as this is important because it helps the overlaid pieces stay in place, and helps prevent them from peeling up.


This was a very quick and easy nail art design, that is bright and colorful.  I really like the crelly base, Mango Bunny's "Baby Cakes," is very light but the hex glitters provide a really nice pop of color.


I hope you too enjoyed this nail art design.  Thanks for stopping by, see you next time.

Your Fellow Plebe,


Fall Foliage

Hello Lovelies!  Happy Sunday to you all!  Many people are not ready to give up summer and move into Autumn, but I am.  I love Fall!  The colors, the food, the festivals, the holidays, the weather; you name anything about Fall and I like it.  I decided it was time to create my first Autumn nail art design of the year...


Since, it has been about a month since I've created any nail art, and because I got some new stamping plates, I decided to do a nice easy layered stamping design.  Here is a list of the materials I used...

Base Coat - SuperChic Lacquer "Bring It On!"
Fab Ur Nails Stamper and Scraper
Uber Chic Beauty Image Plate 5-02
Mundo de Unas "Gold" Stamping Polish
China Glaze "Don't Get Derailed" & "Stop That Train!" (both are from the All Aboard Collection)
Top Coat - SuperChic Lacquer "Marvel"

I started off with mostly naked nails, only a base coat SuperChic Lacquer "Bring It On!"  This has become my favorite base coat, it dries fast and polishes just seem to stick to it.  I decided not to use a base color because the layered stamping will cover the majority of the nail.


I recently order the newest series of plates from Uber Chic Beauty along with an Uber Chic Mat.  I'm not going to go on about the mat, but I will say it's awesome!  For this design I used image plate 5-02, specifically the leaf pattern.


To create this look I simply repeated this print in layers on each nail.  I started with the most opaque colored polish, and layered the more translucent polishes over top.


The first layer is with actual stamping polish, Mundo de Unas "Gold," which was the most opaque...


The second layer is China Glaze "Don't Get Derailed."  Even though this is not a stamping polish it worked well enough but I did find I had to work fast otherwise it would not transfer.  I also found that using a direct press (pressing directly down with stamper) technique for both picking up and transferring the image worked best when stamping with both the China Glaze polishes.


For the third and final layer I wanted to add a pop of color, so I used China Glaze "Stop That Train!"  This was the most translucent (or least opaque) shade of the three, which allows the other colors to show through slightly.  Again this is not a stamping polish but it worked well. 


As you can see, I failed to prep my fingers before getting into the stamping process.  I was just so anxious to get to stamping that I decided to skip the cuticle cover up process.  However, I saw an Instagramer (I believe it was @mrswhite8907) use the scotch tape clean up method, so I thought this would be the perfect time to try it.  Simply, take a piece of scotch tape, lay it on your messy finger (avoid the nail as much as possible), and peel the tape up and the mess away.  Repeat this process until you have most of the mess cleaned up, its that easy!


After a quick tape clean up, I performed a close clean up with gentle acetone and a brush, then applied my new favorite topcoat, "Marvel" from SuperChic Lacquer.  This topcoat is super shiny and dries unbelievably quick, plus its not thick and sticky like most others.


This was a very quick and easy nail art design that was just what I needed to get back into the nail art groove.  I am so happy that I can stamp so comfortably and easily now.  I struggled with stamping for so long.


I am really looking forward to using my new stamping plates and mat, to do some reverse stamping and a few other things that I have in mind.  So be sure to stay tuned to see what I come up with next.


I really love the way these nails turned out, the colors and the layers create a perfect Autumn look.  I hope you enjoyed this nail art design as much as me.  Thanks for stopping by, see you next time.

Your Fellow Plebe,


Gothic Gala The Holo Deck Collection Swatches and Reviews

Hello Lovelies!  Today, I have some swatches I wanted to share with you, Gothic Gala Lacquer's "The Holo Deck Collection."  As the collection name implies it is a collection of holo lacquers.  This collection is inspired by Star Trek, but trust me when I say, you don't have to be a Trekkie to want, need, or fall in love with this collection. 


All of the swatches you are about to see were swatched with two coats, though many of them are mostly opaque with one coat.  I did not use a special base coat, in fact I used a watered-down Elmer's glue, so that I could peel the swatches of easily.  As for a topcoat I did use a generic glossy topcoat, though many of these polishes didn't really needed them.  All photographs are done indoors under sunlight lamps.

Know on to the swatches...

The Dancing Doctor

BLUE!!! Do I need to say more?  You know I'm a sucker for blue, plus McCoy is my favorite character of the original series.


The Enterprise

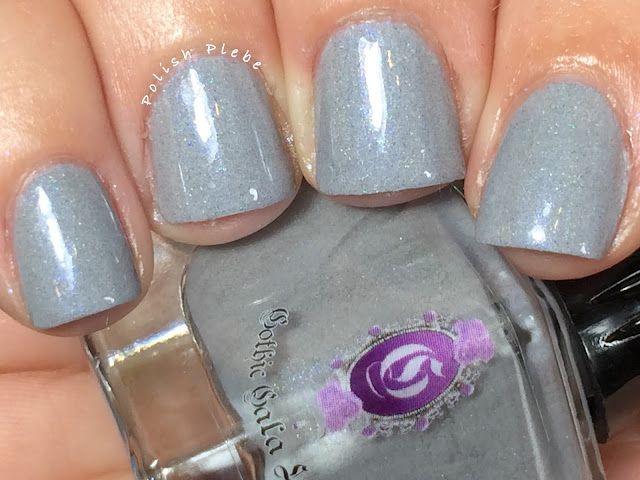
This is a gorgeous pale gray, that almost looks white in some lighting (at least to my eyes).  It definitely is a befitting polish to represent The Enterprise.


My Partner in Crime

I don't own many yellows, and especially don't have any yellow holos, so this was a must have to add to my collection.  This is a very bright mustardy yellow, that couldn't be any more perfect.


Make it So

Okay, many Trekkies know that the red shirt is a bad omen, however this is a red shirt I don't mind wearing.  This is a gorgeous rosy red, that is just to die for!


It's Green, Sir

That it is!  This is a perfect emerald green that I think I'll be using a lot this coming holiday season.  I've said it before and I'll say it again, green is such an underappreciated polish color.


The Search for Spock

I saved this one for last because it is the most unique of the entire collection.  This is a smokey black-purple almost jelly polish full of chrome flakies and holo glitter.  This is a completely drool worthy polish.


Even if you are not a fan of Star Trek this collection is a must have.  The bright bold primary colors full of holo sparkle are absolutely irresistible.  Oh, and they are only on sale until September 20th, so don't miss out, head over to Gothic Gala Lacquers and order yours before it is too late.  Thanks for stopping by, see you next time.

Your Fellow Plebe,
 
 
Nails Art Proudly Powered by Blogger