My First Experience with Jamberry Nail Wraps

Recently, I tried out some Jamberry nail wraps.  I have never tried any kind of nail wrap and had heard many great things about Jamberry.  However, because they're priced slightly outside my budget I had been delaying making a purchase.  Well, a friend of mine recently became a consultant and was able to send me a sample so I could determine if they are right for me and whether or not the expense is worth it.

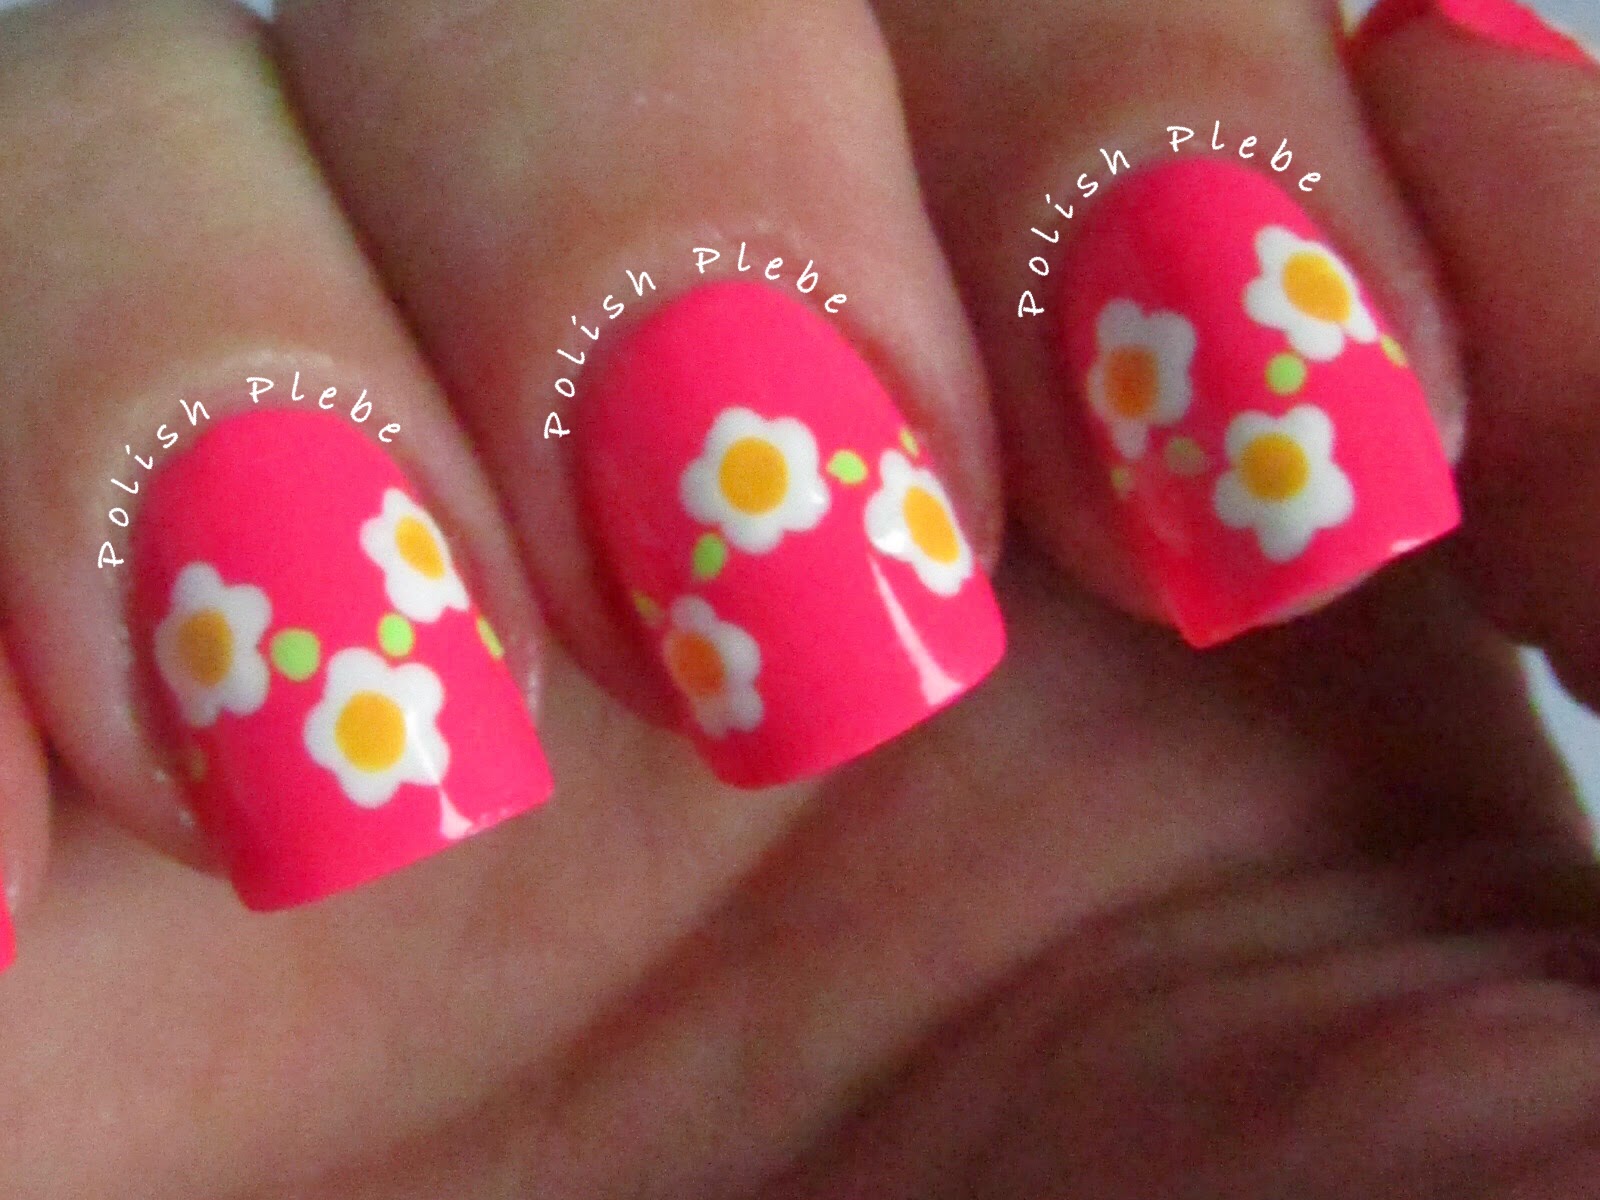
Just like everything in my life nothing ever goes easy or the way I want it to go.  I really like the concept of a nail wrap, beautiful nail art without all the hassle.  My experience at first was awesome.  I applied wraps to my pinkies and pointers on Sunday and painted the rest of my fingers with the intention of wearing this mani for an entire week.  My hope was to show you how great my wraps looked compared to my polished nails.

The application was easy I followed the instruction and even used the special baggie method recommended for those this curved nails.  I had even spent extra time buffing the ridges out of my nails.  I have extremely ridged nails which I had heard can be a problem for getting wraps to adhere properly.


I loved the look of this manicure and was so excited because the number one reason I can't keep a mani is because I get bored with it and remove it sooner than later.  I knew this mani was a keeper.  However, by the second day I was getting peeling along the tip.


I tried to rid it out but by the third day it was peeling up even more.  I attempt to reheat it and get it to stick and when that didn't work I attempted to glue them down using nail glue.  But all to no avail, I could not get them to stay down.

By the fourth day they were catching on everything and peeling even more severly that I finally gave up and just pulled them off.


After discussing my issues with my friend/consultant we determined that one of my issues might be that my nails are not only curved widthwise but that they are also curved lengthwise making my nail a ball shape.  This requires a little extra step in the application technique.  Even though my first experience was a disappointing one I have not given up on them yet and intend to try them again (might as well, since I have more samples).

Have any of you tried Jamberry or any other kind of nail wraps?  If so how was your experience?  I'll post another review once I figure out how to apply them in a manner that works for me.  See you next time.

Your Fellow Plebe,


Ice Cream Nail Art Design

This is not a true #whatruwearingwed manicure because I'm not actually wearing this nail art design right now because I am still wearing the Jamberry wraps that I posted on Instagram Sunday.  I also wanted to post something a little cuter than the nail art design I posted on Monday.  So, I decided to post a tutorial on creating ice cream nails.  I've seen some really cute ice cream nail designs on Instagram from @jamylyn_nails, @hkluvz820, and @vanessa_nbrg and others that inspired me to create my own ice cream nails.

Materials
Base and top coat
Various shades of polish for cone, waffling, and ice cream
Striping brush
Dotting tool

After applying a base coat paint the bottom half to two-thirds of the nail as if painting a french tip with a cone colored polish.  All the polishes I'm using are from Color Club's Paris in Love collection.  I used Je Ne Sais Quoi for my cone color.  It is not important to make this a clean french tip because the ice cream will overlap the cone, however, this is a good opportunity to practice your freehand french tip technique.


Using a darker brown polish and a striping brush, waffle the cone by criss-crossing lines across the light brown cone.  My dark brown is Fondue for Two.


With the cone complete, it's time to put the ice cream on the cone.  With a dotting tool create a line slightly overlapping the cone.  Create drips to give the ice cream a melting affect.


Then fill in the top portion of the nail with your ice cream colored polish.


Clean up your cuticles and apply a top coat.


Use a variety of colors to represent different flavors.  For instance, I used La Petite Mint-sieur on one finger and dotted with Fondue for Two for a mint chocolate chip ice cream cone.


I love this cute and delicious nail art design.  It allows me to enjoy my favorite summer treat without needing to make an extra trip to the gym.  I'd love to see your ice cream manis or whatever you happen to be wearing this Wednesday.  Post you manis on Instagram just #whatruwearingwed and/or tag @polish_plebe.  You can also post your pictures on my Facebook page while your there like and follow me.  You can also follow me through Google Friend Connect by clicking the Join this site icon on the top right hand side of the screen.  You can also follow me through Google+, Bloglovin, and/or Pinterest.  I'll see you all next time.


Your Fellow Plebe,


#LLFandom Challenge - My Homage to the "Walking Dead"


This months Lacquer Legion Challenge is #LLFandom.  I have always been a big fan of zombie movies, shows, comics, and parifinalia.  When I discovered The Walking Dead graphic novels I was excited and then the show came out and I was ecstatic.  So for this challenge I created my homage to The Walking Dead.

I started with Essie's Sew Psyched on my left hand and Color Club's Look, Don't Tusk on my right.  I topped them off with NYC matte top coat.  I choose two colors to represent the dark dismal side of the post apocalyptic world of the walking dead and the light to represent the living characters of the series.


Then using off white acrylic paints I hand painted "The Walking Dead" across my pointer, mid, and ring finger on my left hand.


I then filled in the lettering with red acrylic paint leaving an off- white outline.


With the lettering complete, I hand painted decals using a method I seen somewhere on Instagram.  Sadly, I can no longer find that video otherwise I would reference it.  I plan on doing a full tutorial on the technique I use in the near future.


I created a little bloody hand print which I placed on the pinky of my right hand.  I though it was just too gorily cute not to give it a close up.


For my right hand I created decals of symbols representing the various characters of the Walking Dead series.  A crossbow for everyone's favorite bad boy, Daryl. A sheriff's star representing, Rick.  That silly yet deadly silencer gun that young Carl carries around.  Lastly, the katana sword Mishone is known so well for.


After placing my decals I applied another coat of my matte top coat.  Then using red acrylic paint, a straw and my fingers, I splattered and smeared the paint to make it appear a bloody mess.  Unfortunately, a world full of walkers is not clean and proper.


However, I did clean up the red paint from my skin, and this is what I was left with…


I can't wait for October and Season 5 of the Walking Dead to start.  But in the mean time I'll just enjoy the Novels.  And if for some reason a zombie outbreak occurs at least my claws are ready for the fight.


I had fun creating this nail art design and using a new technique, it might not be pretty like most would expect nail art designs to be but I like it.   If you're a fan of the Walking Dead I would love to see your idea of what a Walking Dead fanicure should look like.  Post your pictures on Instagram and #ilovemanicures or you can post them on my Facebook page.  While your there don't forget to like and follow me if you haven't already.  You can also follow me through Google+, Bloglovin, and Pinterest too!  I'll see you next time.


Your Fellow Plebe,


Hand Painted Water Decal

For this "what r u wearing Wednesday" post I wanted to try a technique I had seen on Instagram that I had never tried before. A wonderful artist @lissmel9 on Instagram posted a video showing how to take a water decal and hand painting.

I happen to have some water decals laying around so I thought I would give it a try.  I had two issues when I did this. 1) I accidentally folded my decal when I was sliding it off of its backing and 2) the design is small and intricate so I was having a hard time keeping in the lines.  Originally I was going to do this design/technique and do two accent fingers my mid and ring fingers but I ended up with doing just my ring finger because I was getting frustrated.  Here is what I ended up with…


I used Sinful Colors Endless Blue which I am endlessly in love with for all but my accent finger.  For my hand painted water decal I used a variety of Sinful Colors, Zoya, and OPI nail polishes.  The dominant yellow polish behind the water decal is Sinful Colors Let's Meet, I love how it sparkles.  Both of the Sinful Colors are from the Chill Out collection which I swatched recently you can check them out here.

The water decal I used is Item #8116 pattern D211 in black from bornprettystore.com.  Don't forget to use coupon code: CREATEX31 for 10% off your next purchase.

This didn't come out as grand as I was hoping but it doesn't look half bad either.  I think the next time I try this technique I will do it with a less complicated decal to make it much easier on myself than maybe I won't have so many issues.

If you are on Instagram checkout @lissmel9, and don't forget to post your #whatruwearingwed mani, and follow me as well if you like my posts.  @lissmel9 also has a You Tube Channel check it out for other techniques and nail art designs.  You can also post your "What r u wearing Wednesday" mani on my Facebook page while your there don't forget to like and follow me.  You can also follow my blog through Google Friend Connect by clicking the "Join this site" icon on the top right hand side of the screen.  You can also follow me through Google+, Bloglovin, and/or Pinterest.  I can't wait to see what your wearing today, see you next time.

Your Fellow Plebe,


Daisy Chain Nail Art

I have seen so many pretty and cute nail art designs with various forms of flowers using many different techniques.  Well I wanted to create a cute floral nail art design that was easy but just slightly unique.  The biggest challenge I had doing this design was deciding what colors I wanted to use.  This is a great nail art project for my fellow Plebes out there.  It allows you to practice your dotting skills and if it is not perfect its still pretty.

Materials
Base and top coat
Base color
Polish or acrylic paint in white, yellow, and green
Dotting tool
Small brush (optional)

I was really having a hardtime deciding on what colors to use.  I new I wanted the the daisies to really stand out.  I also wanted to do something neon and bright for the background because neons are great for summer.  I originally started out with China Glaze's Grass is Lime Greener but decided the flowers weren't going to pop out the way I wanted them to.  So, I finally decided on China Glaze's Peonies & Park Ave from the City Flourish collection (I swatched the City Flourish collection back in April check it out http://ilovemanicures.blogspot.com/2014/04/china-glazes-city-flourish-collection.html).


After painting two coats of Peonies & Park Ave (over my base coat).  I started my design by dotting a five petaled daisy in the middle top of my mid finger with a small dotting tool.  You want the petals to overlap a little but not to much.  I used white acryclic paint for my media because my OPI Alpine Snow was not cooperating.  If you are using acryclic paint add enough water to it to make it a similar consistency to polish.


I then dotted another daisy on either side of the middle daisy but slighly lower.  Leave some space between the flowers.


Then using a slightly larger dotting tool and yellow polish (or paint) place a dot at the center of each flower.  I used Metro Pollen-tin, also from the City Flourish collection.  It is the perfect shade of yellow and it is perfectly named too.


I then used China Glaze's Green is Lime Greener and a small brush to create little leaves between the flowers.  If you don't have a brush use a small dotting tool or a toothpick.  Place the leaves between the daisies in a manner to create a chain.


Alternate your high low pattern all the way across your hand to create a continues chain.  In other words one finger has a daisy high in the middle and low on the sides; the next finger has low in the middle and high on the sides.


If your fingers are narrow like my pinky is only dot two daisies instead of three.


I love this design it is super sweet and so simple.  I like this just as much as my Monochromatic Tread Mark nail art from yesterday.  So, far this week is turning out to be a great mani week.


I would love to see your recreations of this design, you can post them on Instagram #inspiredbyilovemanicures or @polish_plebe in the comments so that I can find them. You can also post your pictures on my Facebook page, while your there like and follow me. You can also follow me through Google Friend Connect by clicking the "Join this site" icon at the top right hand side of the screen. Or if you prefer you can follow me through Google+, Bloglovin, and/or Pinterest.  See you all next time.

Your Fellow Plebe,


Monochromatic Tread Mark Nail Art

So, I have been wearing this nail art design all weekend! I absolutely love it!  I wanted to create something a little retro, slightly geometric, and not over done.  I decided to stick with monochromatic colors because I felt that would give me the retro feel.  I decided to use tapes because that is the best way to create clean lines, perfect for a geometric design.  This is what I did...

Materials
Base and top coat
Two colors of polish
Scotch tape
Striping tape
Gems or studs (optional)

I decided to go with my favorite color, blue, for this design.  So, I started by applying my light blue after applying my base coat.  In this case I used Color Club's In De-Nile from the Safari Garden collection.  (I swatched this collection back in April, you can check it out here
http://ilovemanicures.blogspot.com/2014/04/color-clubs-safari-collection-swatches.html.)


I then applied a quick drying topcoat to speed up the drying process.  You could use drying drops instead.  If you use drying drops you may have an issue with your tape sticking.  This occurs if the drying drops have not evaporated completely.  To resolve this issue clean off the dry polished nail with some rubbing alcohol and a cotton swab or makeup sponge.

Once the polish is dry, take a piece of scotch tape and place it at an angle across the nail.


Then use striping tape to create stripes on the exposed area of the nail.


Apply your secondary color.  I used the darker shade of blue from Color Club's Safari Garden collection named Nail-Robi.  Then quickly remove the tapes.  If you've taped firmly you should be able to remove the scotch tape and striping tape in one felt swoop.  This is what you should end up with...


I repeated this design on my mid-finger reversing the exposed side.  This way when the fingers are posed properly they give a continuous pattern.  I also added some medium silver studs to all my other fingers.  The studs are Item #12411 from bornprettystore.com.  If you order from them use coupon code: CREATEX31 for 10% off.


Like, I said in the beginning, I love this design!  It is pretty simple and the monochromatic tone gives it a fun retro feel.  I think of all the nail art designs I've done this year, this is one of my absolute favorites.  It is definitely in the top five.


I would love to see your recreations, you can post them on Instagram #inspiredbyilovemanicures or @polish_plebe in the comments so that I can find them.  You can also post your pictures on my Facebook page, while your there like and follow me.  You can also follow me through Google Friend Connect by clicking the "Join this site" icon at the top right hand side of the screen.  Or if you prefer you can follow me through Google+, Bloglovin, and/or Pinterest.  I hope you enjoyed this nail art design as much as me, see you next time.


Your Fellow Plebe,


The Answer is in the Clean Up

How often have you sat down with the goal to create a gorgeous manicure or at the very least a nice polish paint job.  But for various reasons, either you had too much caffeine, your in a rush, you have a toddler hanging off your leg, or you just need practice you end up with this…


No one likes unsightly flooded and messy cuticles.  So, why is it everyone else can manage nice neat paint jobs and how can you get the same results?  Well the obvious answer is practice your painting skills, take your time, and be patient.  However, who has time to paint and re‐paint there nails.  Here is a tip for all of my fellow Plebes out there (some of you may be aware of this already), the key to neat cuticles is all in the clean up.


There are several methods and tools you can use to clean up your cuticles and you can employ all of them or a few of them while painting your nails.  One very common method of cuticle clean up is to use one of your finger nails to scrap the excess polish off your skin while it is still wet.


However, you may not want to use your nail if it is already polished.  Why ruin a perfectly polished nail?  Another option is to use a toothpick and run it along your cuticle line.  I employ this technique often.  It works just as affectively as using your nail without getting polish all over your perfect paint.


If the polish has already dried scraping it off may no longer be an option.  If this is the case you could use a q‐tip dipped in acetone or nail polish remover to clean your cuticles.  There are two typical types of q‐tips, the standard kind and the precision type.  However, I don't care for q‐tips because they are bulky and you can just as easily ruin your paint job.  I find that they are more useful for spot cleaning polish from various parts of your finger further from your nail or cuticle.

My most favorite method of cuticle clean up it to use a brush dipped in acetone.  I use an eyebrow brush from a set of cosmetic brush I own.  (I use it a lot which is evident by how stained it is.)  You can also use a paint brush if you'd like.  Whatever brush you choose to use I would recommend it have slightly stiff bristles.  I prefer the eyebrow brush because it is stiff but also because there is a slight angle to the bristles which makes it conform to my nail and cuticle area a little better.  Another tip is that if you don't have one of those fancy pump bottles for your remover use the cap of your bottle as a bowl.  This makes it easier to dip the brush versus trying to dip it in the bottle.  Plus it allows you to keep dirty acetone from muddying up your supply.


So, instead of hiding your less then superior paint job, clean up your act and show it off using these methods.  I hope you found these tip useful in your polishing endeavors, so keep on painting on.  See you next time.


Your Fellow Plebe,


Nails Art Proudly Powered by Blogger