Showing posts with label gradient. Show all posts

My Nails Did Skyline Vinyls

Hello Lovelies!  If you follow me on Instagram or you are part of the G+ Community, Nail Art Nation, you know that I have been very lucky lately.  Recently, I was the first to correctly guess what My Nails Did newest vinyl series was going to be and won a set of said series.  The new vinyls are City Skylines.  Shawna sent me a set that includes: London, Chicago, Toronto, Seattle, and NYC.

I decided to peal off the black boarder for two reasons, one so you could get a better view of the vinyls, and two to perform what I like to call a peal test.  These vinyls have so much detail, with lots of little crevices.  I was a bit concerned that they might not peal well, for that very reason.  I started out very slowly, expecting a piece to get stuck between buildings or to rip off the top of the tower.  I was pleasantly surprised that the backing pealed so smoothly and so easily, without a single problem.

I decided to test these out using the Toronto skyline for this tutorial and review, because it is a place I've always wanted to visit.  It's sad, I've lived the majority of my life in NY and I've never been to Canada.  There are two ways that you can use these vinyls, one way is to use them like a decal, and the second is to use them like a stencil.  I decided to use them as a stencil.

I started off with two coats of Chaotic Glitz 'Little Black Book.'  This was another prize from one of the recent giveaways that I won.  This is a really pretty black that has a holo shimmer to it, if you check my Instagram feed you'll see some macro shots of it that help show off that shimmer.  Also because I am using vinlys I applied a quick drying topcoat.

 
Once, my nails were dry I began applying the vinyls.  Now these vinyls are a little bit trickier to apply than some others because the skyline is one continues scene.  Therefore, you have to divide it amongst your fingers.  I did so by starting on my pinky, I placed it and then trimmed it with a small pair of scissors, and repeated this process across my nails.  However,  I had a slight problem when I got to the CN Tower and had to shift the vinyl slightly to make it fit on my nail.  If I had thought it out properly, I would have started with the placement of the most important building and adjust the others accordingly.  I made it work well enough though.


If you are using the vinyls as a stencil, remember to leave enough of the vinyl hanging off the end or side of the nail so that you can peal it off without disturbing your polish.  I also prepped my fingers with a liquid latex before I got to the messy goodness of the sponged gradient.


I did a sponged gradient of China Glaze 'One Track Mind,' 'All Aboard,' and 'Metro Pollen-tin.'  This may seem like a weird combination but my goal was to create a night time city light scene.  For the very first layer of sponging I applied a white over the three colors because I was sponging over black.  After, the first layer I proceeded with just the three colors and no white.  It took me about four layers of gradient to achieve the desired opacity.


I then pealed off all the vinyls and liquid latex barrier.  As you can see I had a couple oopsies along the edge of some of my nails.  There is also a little bleed over at the base of the CN Tower that happened when I removed the vinyl (hard to  see because of the glare). 


I performed a great deal of clean up some with acetone and a q-tip, and a bit with acetone and a brush.  I also used a small detail brush and fixed the messed up areas.  I also applied a final layer of quick drying topcoat.  I decided to use another of my new goodies Superchick Lacquer 'Marvel' quick drying topcoat.  It dried unbelievably fast, and as you can see is super shiney.  (I also used Superchick's 'Bring it On,' basecoat for this manicure too.)


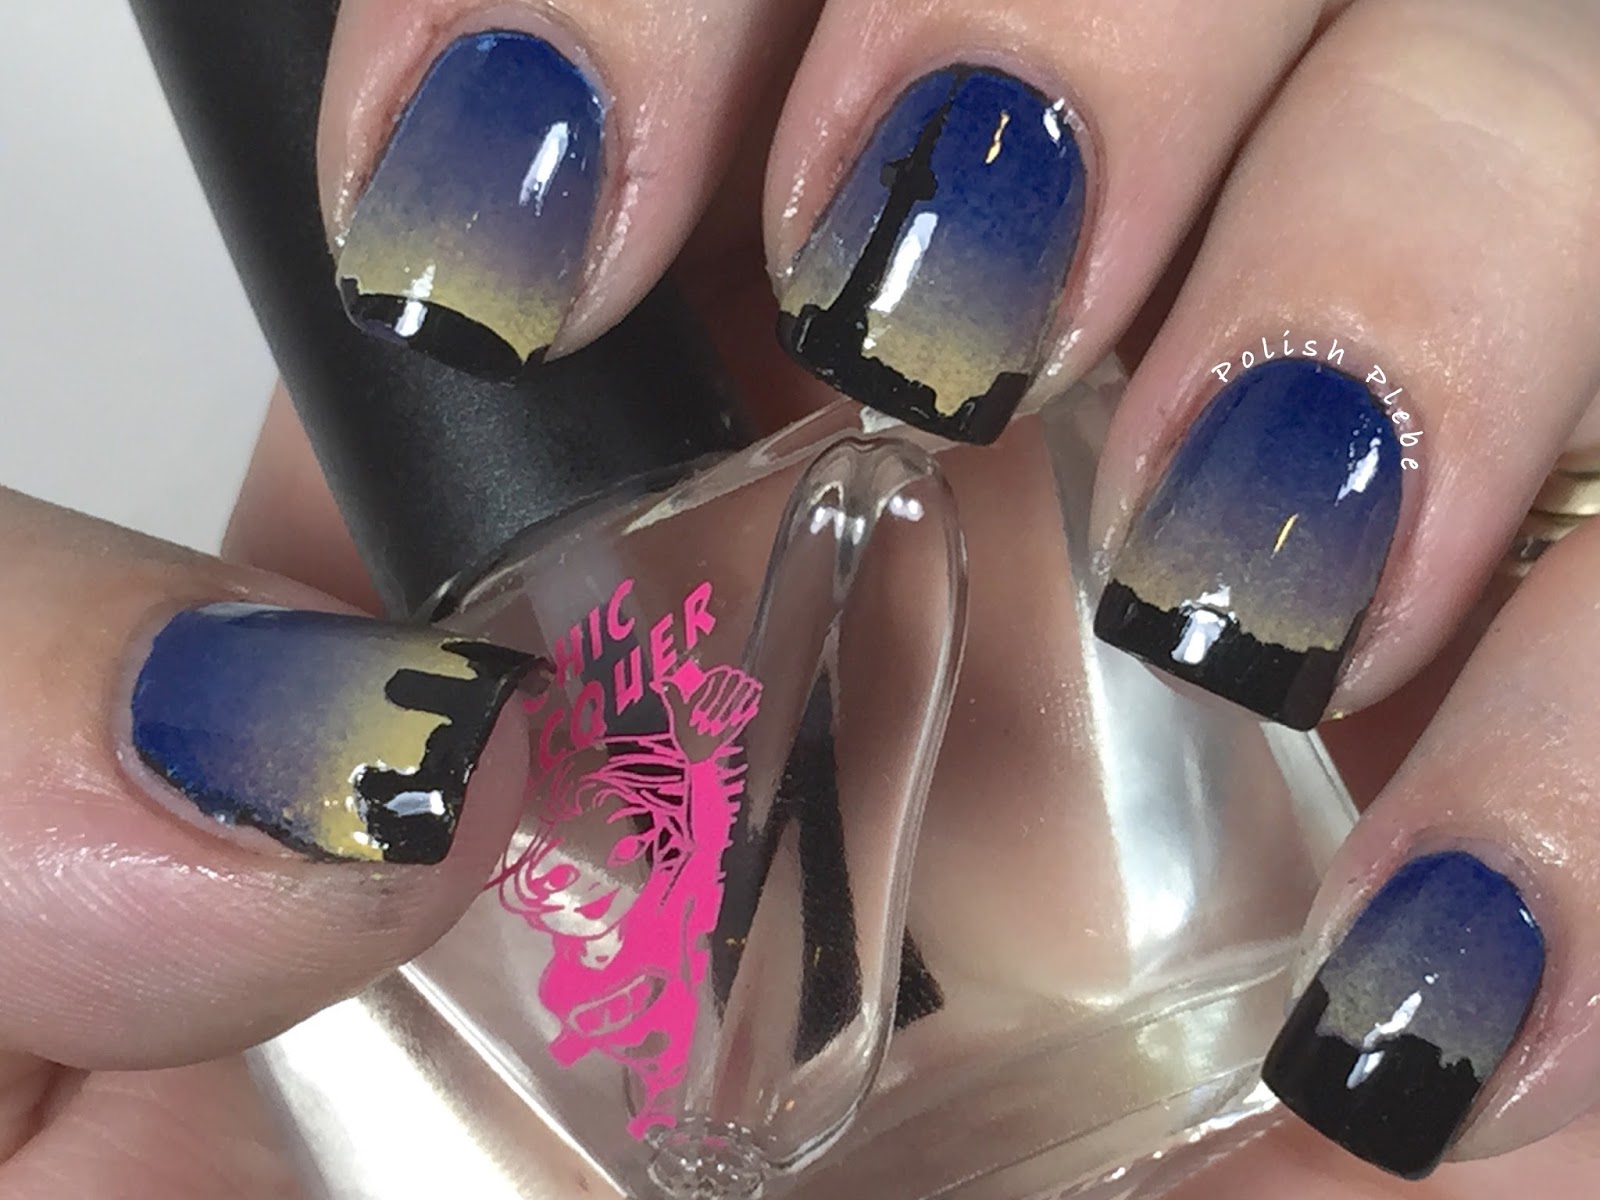
The city glow turned out just the way I had hoped it would.  I was going to add some stars to the darker areas, but decided against it because I didn't want to take away from the gradient. 


Even though these vinyls require a little more effort during placement, I love the continuous scene.  The quality of the vinyls are excellent, the cuts were absolutely perfect.  I think it is wonderful that Shawna decided to create skylines of actual cities instead of just a generic city skylines, and she has many cities to choose from.  I'm super excited that she sent me a Seattle skyline, because it's one of my favorite cities, and I'm taking a trip there in October.  I'm sure you can guess what I'll be wearing on my nails.  This is my first experience with My Nails Did, and I was very pleased, she has many unique vinyls and you can bet that I'll be purchasing from her in the near future.


Also, if you don't see a city that your interested in send her an email, and she'll work with you to see if she can make it happen.  I hope you enjoyed this nail art design, and found the product review useful.  Thanks for stopping by, see you next time.

Your Fellow Plebe,


Gradient with Scallop Stamping

Hello Lovelies! I'm having an incredibly busy week and it doesn't look like I'm going to get much of a break through the rest of it either.  However, I did have sometime so I threw together this quick gradient and threw some stamping on top of it.  This was one of those unplanned nail arts that I just kind of went with what seemed right and I am very pleased with the results.


Materials I used:
Base coat - INM Ridge Free
Gradient colors - Lucky Lacquer 'Forget Me Not,' 'Mint Daisy,' & 'Teal We Meet Again'
Make up sponge
Mani mask - Ellagee 'Lickity Split Mani Mask'
Glitter topper: Color Club 'Concrete Jungle'
Image plate - Pueen 15
Silver stamping polish from Mundo de Unas
Stamper and scrapper from Fab Ur Nails
Top coat - Rica 'Glossy Glam'


To give my gradient something to stick to I started off with one coat of the lightest color used in the gradient.


I prepped my fingers with a mani masks, because I am very messy I also apply the mask to the tips of my fingers too.


Using a slightly damp make up sponge I applied my gradient.  It took about four applications to achieve the desired opacity.  I don't always mention this but I typically dampen the sponge I'm using for gradients because it smooths out the colors and help to create a better blended gradient.


With the gradient complete, I took a moment and removed the mani mask and did a brief clean up. 


I really love the way this gradient turned out and I almost left it there but then I remembered a sparkly top coat that I have had in my stash for a while that I thought would compliment this nicely.  So I went ahead and applied said top coat...


The iridescent shimmer and the blue made me think of the ocean, and what lives in the ocean? Well mermaids, of course.  I thought this would be an ideal time to try out some stamping.  Sadly, I don't have a mermaid or simple scale image.  However, I found this fancy scallop print that almost reminds me of a mermaid scale so I thought it would work just fine for this nail art.  Using the image from Pueen plate 15, silver stamping polish from Mundo de Unas, and my new favorite XL squishy stamper from Fab Ur Nails, I stamped the scallop print on all my nails.


The image transferred perfectly except for a couple areas where my aim was a little off, yay!  I finished up this nail art by cleaning up with acetone and a brush, and apply a glossy top coat.


For a spur of the moment, completely unplanned, thrown together nail art I think this turned out very well.  I do want to practice stamping a bit more and there are lots of images that I have that are inspiring so many different nail art ideas. 


I think I would like to try my hand at reverse stamping again.  I've tried it once before, but was frustrated because I couldn't pick up a crisp image but that doesn't seem to be a problem with my new stamping supplies.


I really am in love with this design.  I hope it lasts a while because I'm not going to have much time for nail art the rest of this week, plus it's really pretty.  I hope you too enjoyed this nail art, thanks for stopping by, see you next time.

Your Fellow Plebe,


Fading Lines

Hello Lovelies!  Today, I have a nail art design for the last prompt of May's Freehand IG challenge.  The prompt is simply favorite color, and anyone who has read my blog or knows anything about me, knows that my favorite color is blue.  I decided to use two of my favorite blue Color Club polishes, along with my favorite technique, and pattern to create this look...


Materials I used:
Base coat - INM Ridge Free
Light blue - Color Club 'In De-Nile'
Dark blue - Color Club 'Nail Robi'
Ellagee 'Lickity Split Latex Mani Mask'
Make up sponge (not shown in picture below)
Striping brush
Top coat - Rica 'Glossy Glam'

 
I prepped my fingers with my ridge filler base coat, I always use a base coat to minimize nail staining.  I really like this base coat because unlike other ridge fillers it isn't thick, yet it still gives my nails the smooth surface that usually takes a significant amount of buffing for me to obtain without a ridge filler.  I also applied a liquid latex mask, to help with the clean up process. 


For this post I decided to bring back using my left hand so that you can see the progress it is making since I broke most of my nails on this hand a couple weeks ago.  As you can see they are still a bit nubbly, uneven, and I have a couple of weird corners.  However, they're making a strong come back so far, so I thought I would encourage them by letting them show off this post.

I began this design with a gradient, currently my favorite nail art technique.  I decided to use what I am referring to as the quick gradient method.  Instead of using a white or light colored base I started off with painting my nail half of each shade.  I reversed the color order on each nail to make it a little more interesting.


Then using a make up sponge (like you do), I blended the colors in the manner you do with a traditional gradient design.  The hardest part about this was remembering to flip the sponge so that I didn't ruin my color pattern.


At this point I removed the mani mask and performed a little bit of clean up before proceeding to the freehand portion of the design.


Since, this is for the Freehand IG Challenge I had to do something freehand for this nail art so I decided to go with my favorite pattern, vertical stripes.  Using a striping brush, I used my two blue polishes and striped three stripes on each nail, alternated between the light and dark across all my nails.


I performed a final bit of clean up with acetone and a brush, and applied my shiny top coat.


The final result is a neat monochromatic blue fading stripe design.  The stripes appear to fade in and out of the gradient, which I think is a pretty cool affect.  I would have preferred to use striping tape to create cleaner lines, but it was good to practice my freehand stripes.


I'm so excited that I completed another challenge!  As I said before, I really enjoy the Freehand IG Challenge, its a great motivator to practice my freehand skills.  I really hope they do it again in June, and I hope you all decide to join in.  If they post a June challenge I will be sure to share it with you here, that way if you're not on Instagram you can still join in.  If you are on Instagram, please check out my account and follow me if you aren't already, I post nail mail, works in progress, and some personal pictures there.


I post on many different social medias and share with a few different nail art communities.  If you would like to follow me or see where I hang out online check out my 'About Me/Contact Information' page to see my channels and links so that you can find me easier.  I appreciate each and everyone of my followers on all my networks, your likes, kind comments, and even page views put a smile on my face.  Thank you so much for stopping by, see you next time.

Your Fellow Plebe,


Outline Flower over Gradient

Hello Lovelies!  I hope you all had a wonderful weekend, I hope you had an opportunity to spend some quality time with your mother and/or children.  I had an exceptional day!  My two year old who usually likes to get up with the sun decided to give me some quiet time in the morning and slept in, which gave me time to create this nail art design.  I created this for this week's Freehand challenge on Instagram, the prompt was a freehand design over a gradient.  If you've read the last few posts I've made involving gradients you know that gradient designs are my new favorite thing, so I was excited and ready for this prompt.  This is what I came up with...


Materials I used:
Base coat: Seche Vite
White Undie: Sinful Color 'Snow Me White'
Three polishes for gradient: China Glaze 'Lotus Begin,' 'Grass is Lime Greener,' & 'Thistle Do Nicely'
Glitter topper: China Glaze 'Fairy Dust'
Latex mani mask: Ellagee 'Lickity Split Latex Mani Mask'
Makeup sponge
Black nail art striper
Top coat: Rica 'Glossy Glam'


I prepped my fingers with a white base polish to make my colors brighter and applied my mani mask for easier clean up.  Remember, when using a latex mask, don't allow your fingers to touch together where the latex is.  It will stick to itself and most likely pull off, like it is between my pinky and ring fingers.


I then did a sponge gradient of light purple, green, and a neon orangy (almost pink shade).  It took me four sponge coats to get the opacity that I wanted.  I really like how these colors blended because it creates an almost rainbow affect.


After removing my mask and performing a small bit of clean up I applied a glitter topper, 'Fairy Dust,' over the gradient.


I was quit content with this gradient and the 'Fairy Dust' that I would have been more than happy to leave it here.  However, this was to be the base for this week's Freehand challenge and so it is.  I decided to do a simple flower outline over this gradient.  I used a black nail art striper and started the flower by drawing a half circle in the corner of my nail.  I outlined that with a second circle, then drew three petals extending from the circle.  I drew petals between the full petals and then finished off the flower by drawing a grid in the center and triangle-like shapes on the full petals for dimension.


I repeated this flower design on all my nails only changing the orientation of the flowers.


I did some light clean up and then added my new favorite top coat Rica 'Glossy Glam' after giving the flowers a few minutes to dry.


I was a little worried that the flowers would take away from the gradient, but I think they turned out quit well.  In fact, I am absolutely in love with this nail art design.  I know I've said that about designs in the past but I really don't want to take this one off.  I am hoping it will last for a few days at least.


I am really enjoying the freehand challenge so far.  Those of you who are keeping track, the first prompt of this months Freehand Challenge on Instagram was actually cartoon.  I did create a nail art design for this but not a blog post.  I did post pictures on Instagram, so if you are interested in seeing that nail art design checkout my Instagram feed and look for my Perry the Platypus nails.  If you are interested in trying out this challenge the prompts are listed at the very bottom of this post.  It's never to late to start, and I highly recommend this challenge to all skill levels.


I really do hope you like this nail art design and found the pictorials helpful.  Thanks for stopping by, see you next time.

Your Fellow Plebe,


Nails Art Proudly Powered by Blogger