BEGL Fan Favorites Swatches and Review

Hello Lovelies!  Today, I have swatches and review of five polishes from Blue-Eyed Girl Lacquer Fan Favorites Collection.  I was very excited to swatch these polishes and to say the very least I was not disappointed.  It' is not surprising that the polishes are  fan favorites, each is unique, beautiful, and the formulas are great, but we will get into that a bit more with each swatch.


All of the swatches that you are about to see are photographed indoors under daylight lamps.  Sadly, the weather has been miserable here in New York, and the sun hasn't been seen here in days.  These polishes deserve to be photographed in the sun, but lamplight will have to do for now.  Also, I did use a generic glossy topcoat on all of the swatches you are about to see, and I used INM Ridge Free for a basecoat because I didn't want my nail ridges to affect the beauty of these polishes.   Shall we get on to the swatches then...

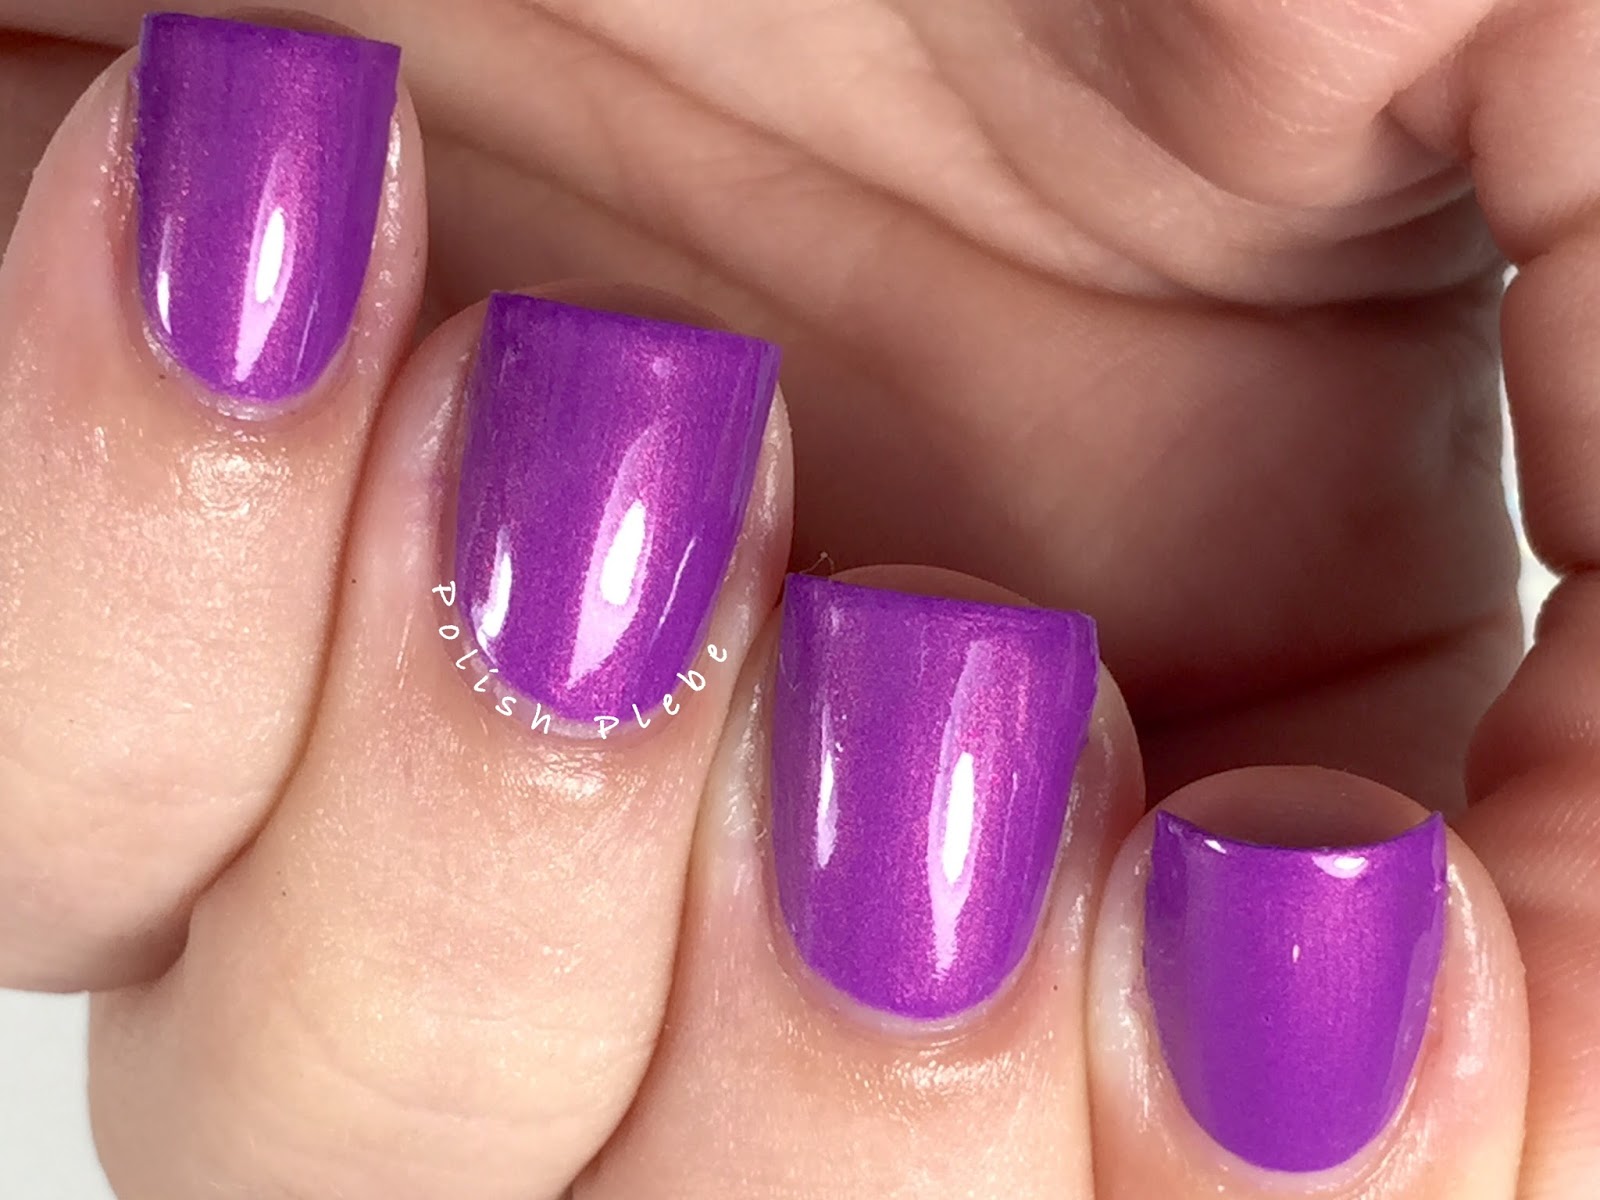
Wanna Fall in Love Tonight


This is described as a purple with glowing red shimmer.  To me it is a neon dark metallic purple that is absolutely gorgeous.  There are not to many purple polishes that I am fond of but this one is fantastic. 


This was mostly opaque with one coat but is swatched with two coats for good measure.


Individual full size bottle will be $8.50 and mini bottles will be $5.00


I Still Adore


This is an orchid pink holo with a gold to pink shift.  The holographic shift in this polish is intense.  Making it irrisistable and difficult not to stare at. 


Mostly opaque with one coat but swatched in two for good measure.


Individual full size bottles will be $12.00 and mini bottles will be $6.00


Cherry Blossom


This is one of the sweetest polishes I have ever laid my eyes on.  This is a baby pink with aqua to silver shimmer.  Honestly, my pictures do not do this polish any justice, this is an absolutely stunning polish. 


I was surprised by how opaque this was, it was mostly opaque with one coat but again I did two for a clean application.  My experience with light colored polishes such as this are usually so disappointing but the opacity of this just blew me away.


Individual full size bottles will be $12.00 and mini size bottles will be $6.00


Bound to the City Life


As most of you know I love blue shades and this is no exception.  This is a dark teal jelly jammed packed with teal, turquois, purple, and blue holographic microglitters. 


I have never been very impressed with jelly polishes but this is incredible.  The color is gorgeous, it applied so smoothly and so clean.  This is shown with only one coat, I didn't feel it needed anymore than that.


Individual full size bottles will be $8.50 and mini size bottles will be $5.00


Fierce and Free


This is such a complex jelly polish and one of the best jelly glitters polishes I have ever applied.  This is a medium orange or reddish orange that is packed, and I mean packed with glitter.  This jelly has gold, orange, red, and berry pink holo glitters, metallic microglitters, small glitter, and pink to gold shifting flakes.  This polish was based off of a photo from the Design a BEGL contest. 


I applied only one coat because that was all that was really necessary.  I was very impressed by the smoothness of the application and how well the glitters placed themselves.  Most of my experience with jelly glitters has been a frustrating process of trying to fish glitter out of a bottle after setting the bottle upside down for several minutes and then only get a few pieces.  This polish, on the other hand, was an absolute dream to work with.


Individual full size bottles will be $8.50 and mini size bottles will be $5.00


Release

These five gorgeous polishes along with five other make up the entire Fan Favorites collection.  All polishes in the collection will be available in full size and mini size bottles.  You have the option to purchase individual bottles as well as the complete set.  The complete set in full size will cost $102.50, complete mini sets will cost $55.  Complete set prices and individual prices listed in this posting do not include shipping and handling.  BEGL ships both domestically and internationally (hooray!!! for all my international nail pals out there).

These will be available for pre-order for a 24 hour period starting Tuesday, June 30th at 3pm est until Wednesday, July 1st.  Be sure to place your orders within that time to ensure you get the polishes you want.  Any remaining polishes left over after the preorders have shipped will be added to her shop.

In addition, to the Fan Favorites collection BEGL will also be releasing the newest limited edition Siren Series, and Destination Duo Collaboration with a Rhyming Dictionary.  These polishes will not be a pre-order sale but a stocked items with a limited quantity available.

Final Thoughts

My first experience with BEGL was when I purchased the Indie Mani Bunny Box.  I was so beyond impressed with the quality, and appearance of Julie's polishes.  These polishes are just as, if not even more impressive.  The formulas are fantastic, the application is easy and smooth, and the colors...well you can see how gorgeous the colors are.  I highly recommend these polishes, BEGL offers something for everyone whether you like metallics, holographic polishes, jelly, cremes, you name it she offers it.  You will not be disappointed.

I hope you enjoyed the swatches of these lovely polishes, and found the review useful.  I am providing links below to BEGL social media channels so that you can find swatches of the other polishes she will be releasing, be sure to check them out.  Thank you for stopping by, see you next time.

Your Fellow Plebe,


Mr. Sun

Hello Lovelies!  I hope you have all enjoyed a lovely weekend.  I just finished a mani for this week's Freehand Challenge: Weather prompt.  I had a hard time deciding what kind of weather I was going to try to paint on my nails, because I love all kinds of weather (except for snow).  However, I was inspired by my little cutie pie, who is two.  She loves to sing songs about the sun, such as Mister Sun and You are My Sunshine.  So, of course, I had to go with a sunshine nail art design, and I decided to make it a bit cartoony because she is two.

Materials I used:
Basecoat - Yellow Stopper
Base color - Lucky Lacquer 'Forget Me Not'
Acrylic paints - the set I used is from bornprettystore.com.  The set cost $10.89 and includes 12 colors, 4 brushes, and 2 paint palettes.  Its a great value, plus you can use code: CREATEX31 for 10% off.
Brush from acrylic set
Matte topcoat from Nicole by OPI
Glossy topcoat from Ciate London


I began with two clean coats of my favorite light bright blue polish, which I topped with a matte topcoat.  I almost always use a matte topcoat when I am using acrylic paints because I feel the paints apply smoother and cleaner over a matte finish.  If you frequently use acrylics, of course, do what works best for you.


Originally, I was going to create a scenery involving a smaller sun but then decided to just make the sun larger.  I started off my painting a half circle across all four of my nails.  I failed to do a white base so I had to do multiple layers of yellow to get it this bright.  I highly recommend using a white under any bright colors, please save yourself the hassle of multiple coats.


I outlined the sun with orange and added in yellow and orange sun rays.


I finished up the seen by using two shades of green to create a grassy horizon.  I added a couple of white fluffy clouds and gave them some dimension by outlining them with some grey.


On my thumb I just created a horizon and added a couple of clouds, nothing fancy.  I still think it is cute though.


Of course, I performed my usual clean up with acetone and a brush, and applied a topcoat.  At first I added a glossy topcoat.


Then I decided that I would prefer it with a matte topcoat instead. I like how it looks like a chalk drawing.


I like this simple cute cartoony sun and my daughter approves too!  She loves watching me paint my nails and she loves having her nails painted too.  She is my little mini me!  I hope you enjoyed this nail art design as much as she does.  Thanks for stopping by, see you next time.

Your Fellow Plebe,


Negative Space and Fanbrush

Hello Lovelies!  I know it has been about a week since I last posted any new nail art.  I took some time to hang out with family and friends, it was a whirlwind weekend and I'm just getting caught up.  I created this manicure for last week's Freehand Challenge fanbrush prompt (better late than never, I suppose)...


To be honest, I really didn't know what to create for the fanbrush prompt but I really wanted to do a negative space manicure.  It has been awhile since I have created one so I thought it was time.

Materials I used
Base coat - INM Ridge Free
Binder reinforcement dots
White base polish - Color Club 'Blank Canvas'
Liquid Latex - Ellagee 'Lickity Split Mani Mask'
Fanbrush polishes - Color Club 'Midnight Mulberry,' 'New-tral,' & 'Get a Mauve On It'
Fanbrush
Top coat - I. A.M...Custom Color 'Diamond PRO'


I started this look off with my INM Ridge Free base coat.  This base coat is great for negative space and French tip nail art designs because it is pink.  Not to mention that it is a ridge filler so if you have ridged nails like I do they will even out those perfections easily.  You can see on my ring finger some striations (the darker vertical lines on my tip)  these are actually ridges that go all the way up my nail, but you can see the ridge filler makes my nail nice and even.


Using binder reinforcements  I covered different areas of my nail.  I then painted my white base color and immediately removed the reinforcements.


I used the reinforcement dots in different positions on each of my fingers to creating interesting negative spaces on each one.  I would have been happy to leave it here, but this is for the fanbrush prompt so I continued on.


At this point you could wait for the white base coat to dry or apply a quick drying top coat and reapply reinforcements to cover the negative space.  However, because this is for the Freehand Challenge I felt I needed to do more freehand with this design.  After giving the white a little time to dry, I used liquid latex to protect the skin around my nail and to fill in the voided areas.  With the negative space covered, I layered three shades of polish by swiping the fanbrush in different direction with each color, horizontally, vertically, and diagonally.  (Follow pictures from the top right, down, then across the bottom.  The larger picture in the top left is the finished design.)


Once satisfied with the brushing remove all the latex, perform a bit of clean with acetone and a brush, and apply a topcoat.


I'm glad I decided to go with softer slightly more neutral colors for this nail art design, I feel it compliments the negative space nicely.  I also liked using the reinforcement dots, creating interesting curved lines was a good change.  The design on my pinky is my favorite.  Do you have a favorite?


I really hope that I can create a few more nail art designs for you this week, but we will have to see what my schedule will bring.  I'm sure many of you will agree that having responsibilities can be a pain.  I appreciate you taking the time to take a peek at my blog. I hope you enjoyed this design, and found the tutorial useful.  Thanks for stopping by, see you next time.

 
 Your Fellow Plebe,

Gradient with Scallop Stamping

Hello Lovelies! I'm having an incredibly busy week and it doesn't look like I'm going to get much of a break through the rest of it either.  However, I did have sometime so I threw together this quick gradient and threw some stamping on top of it.  This was one of those unplanned nail arts that I just kind of went with what seemed right and I am very pleased with the results.


Materials I used:
Base coat - INM Ridge Free
Gradient colors - Lucky Lacquer 'Forget Me Not,' 'Mint Daisy,' & 'Teal We Meet Again'
Make up sponge
Mani mask - Ellagee 'Lickity Split Mani Mask'
Glitter topper: Color Club 'Concrete Jungle'
Image plate - Pueen 15
Silver stamping polish from Mundo de Unas
Stamper and scrapper from Fab Ur Nails
Top coat - Rica 'Glossy Glam'


To give my gradient something to stick to I started off with one coat of the lightest color used in the gradient.


I prepped my fingers with a mani masks, because I am very messy I also apply the mask to the tips of my fingers too.


Using a slightly damp make up sponge I applied my gradient.  It took about four applications to achieve the desired opacity.  I don't always mention this but I typically dampen the sponge I'm using for gradients because it smooths out the colors and help to create a better blended gradient.


With the gradient complete, I took a moment and removed the mani mask and did a brief clean up. 


I really love the way this gradient turned out and I almost left it there but then I remembered a sparkly top coat that I have had in my stash for a while that I thought would compliment this nicely.  So I went ahead and applied said top coat...


The iridescent shimmer and the blue made me think of the ocean, and what lives in the ocean? Well mermaids, of course.  I thought this would be an ideal time to try out some stamping.  Sadly, I don't have a mermaid or simple scale image.  However, I found this fancy scallop print that almost reminds me of a mermaid scale so I thought it would work just fine for this nail art.  Using the image from Pueen plate 15, silver stamping polish from Mundo de Unas, and my new favorite XL squishy stamper from Fab Ur Nails, I stamped the scallop print on all my nails.


The image transferred perfectly except for a couple areas where my aim was a little off, yay!  I finished up this nail art by cleaning up with acetone and a brush, and apply a glossy top coat.


For a spur of the moment, completely unplanned, thrown together nail art I think this turned out very well.  I do want to practice stamping a bit more and there are lots of images that I have that are inspiring so many different nail art ideas. 


I think I would like to try my hand at reverse stamping again.  I've tried it once before, but was frustrated because I couldn't pick up a crisp image but that doesn't seem to be a problem with my new stamping supplies.


I really am in love with this design.  I hope it lasts a while because I'm not going to have much time for nail art the rest of this week, plus it's really pretty.  I hope you too enjoyed this nail art, thanks for stopping by, see you next time.

Your Fellow Plebe,


Nails Art Proudly Powered by Blogger