Showing posts with label vinyls. Show all posts

Merry and Bright Christmas Nails

Hello Lovelies!  Sometimes it can be difficult to find new and interesting designs, especially when you want to do something themed, say for the Holidays.  Lately, I have been in a bit of a slump because I feel like so many Holiday nail art designs are over done, and I just don't want to keep doing what everyone else is doing.  Don't get me wrong, I love what I am seeing on others' blogs and Instagram feeds, but I also like to be different, even if only a little.  I decided to look to my Christmas tree to get some inspiration, and one particular bauble kept grabbing my attention.  So, I decided to use it as my inspiration for this nail art design...


Materials I used:
Basecoat - SuperChic Lacquer "Bring it On!"
White base polish - Sally Hansen Xtreme Wear "White On"
Holo polishes - Glisten & Glow "Midori Sour," "Hpnotiq Hurricane," and "Sloe Gin Fizz"
Lou it Yourself Candy Swirl Vinyls
Small brush
Pueen image plate 10, 21, & 22
Fab Ur Nails XL stamper and scraper
Topcoat - Glisten & Glow "HK Girl"

I began with a clean white base polish.


On my pointer and my pinky, I created candy swirls using vinyls from Lou it Yourself (link above).  I purchased these vinyls a bit ago, but this is the perfect time of year to use them.  I was a little reluctant to use these vinyls because I have seen many other similar vinyls and they typically leave a blank space in the middle.  Most people use a gem or a dot to fill in this weird blank center.  These vinyls meet in the middle perfectly, leaving you with a near seamless candy swirl pattern, so if you want perfect candy swirls I highly recommend these vinyls.

To use these vinyls apply a quick drying topcoat over your base polish and allow to dry.  Place the vinyl, and trim slits in vinyl between the candy stripes (not pictured, sorry).  Fill in the candy stripes with desired polish, I used three colors so I filled in stripes across from one another to make this work properly.  To prevent pulling I removed parts of the vinyls as I filled in the stripes.  I plan to post a quick video to my Instagram account later today, that will help understand what I did a bit better.


On all my other fingers I randomly stamped a present, reindeer, and wreath in the same colors that I used in the candy swirls.  The holo polishes didn't stamp as well as I had hoped, and before I applied the topcoat, the images didn't appear holographic at all.  I would not recommend using these polishes for stamping to a stamping beginner, however, if you have some experience you may not have so many problems.


After a bit of clean up with some gentle acetone and a brush, I applied a quick drying glossy topcoat.  Applying the topcoat really helped the holo show in the stamped images.


In all honesty,  this didn't turn out exactly as I had imaged, primarily because the stamping isn't opaque as I was hoping.  I do, however, really like the color combo and the unique aspect for a Christmas design.  Plus, they match my Christmas bauble quite well, don't you think?


I hope you enjoyed this merry and bright Christmas nail art design.  Thanks for stopping by, see you next time.


Your Fellow Plebe,


Autumn Moroccan Print

Hello Lovelies!  Oh, how the time is flying!  I can't believe November is already here, I barely had time to enjoy October.  Now that we are moving past Halloween, I feel it is time to get away from the dark and dreary, and move onto something brighter and more cheery.  So, I decided to create this bright yet Autumn-esque Moroccan nail art design...


Materials I used:
Basecoat - SuperChic Lacquer "Bring it On!"
Polishes - Color Club "Look, Don't Tusk", "Tribe and True", "Apple of My Eye", "Off Duty", & "Antiquated
Moroccan Vinyls from Lou it Yourself
Medium/small dotting tool
Topcoat - SuperChic Lacquer "Marvel"

I started of with a nice off white crème base, to keep the design light and bright.  Because I am using vinyls to create this design I applied a quick drying topcoat and allowed it to dry completely.


I then applied my vinyls.  A tip for using full nail stencils is to cut little slits around the edges to help it flex and lay flat.  I find this particularly helpful because my nails are so curved.  I cut one slit on each side of my nails as well as near the smile line and the free end to help the vinyl to conform to my nail.  Using a dotting tool I filled in each Moroccan bauble, working each color in a row vertically down my nail.


I repeated the color pattern on my pointer, mid and ring finger.  On my pinky and my thumb, I used a left over piece of vinyl and filled in one Moroccan bauble near the smile line of my nail.  As always I performed a bit of clean up with gentle acetone and a brush.  I applied a final layer of quick drying topcoat, being sure to float it over the design to prevent the colors from streaking.


I love working with vinyls, they are simple, quick, and easy to work with.  The biggest challenge creating this design was working quick enough and peeling the vinyl before the polish dried too much.  I did end up with a little pulling but the design makes up for the minor problem areas.


Autumn is my favorite time of the year for many reasons, one reason being the colors.  The colors in this nail art design are perfect for this time of year, they kind of remind me of the leaves currently carpeting my lawn.  I hope you too enjoyed this nail art design, thank you for stopping by, see you next time.

Your Fellow Plebe,


Halloween Damask

Hello Lovelies! Halloween is one of my favorite holidays, those of you that have followed my blog for awhile are probably already aware of this. When most people think of Halloween they think of ghostly specters, haunted houses, blood, guts, and gore. However, I present to you a different side of Halloween, a bit of gothic elegance. These are my Halloween damask nails...


Materials I used:
Basecoat -  Dream Polish "Smooth Gem Basecoat"
Polishes - Zoya "Penny" & Sinful Colors "Black on Black"
Fleur De Lis vinyls from Lou It Yourself
Pueen image plate 23
Fab Ur Nails XL squish stamped and scraper
Black stamping polish from bornprettystore.com use code: CREATEX31 for 10% off your next purchase
Topcoat - SuperChic Lacquer "Marvel"

I began with black polish on my pinky and thumb, and I painted my three remaining fingers orange. I created this nail design for this weeks Nail Art Nation orange prompt, so I wanted orange to be the dominant color.  I also applied a quick drying topcoat on my ring finger.


I applied a Fleur De Lis vinyl on my ring finger.


I stamped the metallic orange over the black and black over the orange.


After a quick clean up with gentle acetone and a brush, I sealed it all with a quick drying topcoat.  It is especially important to use a topcoat when using vinyls as a decal, this ensures that they won't peal off.


I love this design, it is a very feminine and pretty version of Halloween nail art that can be worn any day and any where.  I particularly like the subtle metallic orange over the black, it has a somewhat  ghostly affect.  I hope you enjoyed these slightly different halloween-esque nails, thanks for stopping by, see you next time.


Your Fellow Plebe

ZigZag Nails Inspired by @lifeisnails

Hello Lovelies!  Today, I have a mani I created because I was inspired by the wonderfully talented Ramie of : +Lifeisnails.  I have been following her on Instagram, @lifeisnails, for a while and when she posted her Colorful Zigzag Nails a couple months back, I knew I had to try them.  I finally got around to creating my own version of her nail art, and this is what I came up with...


Materials I used:
Basecoat/polishes/matte topcoat - all from the Butter London "Gears & Gadgets" Steampunk Trunk, I purchased last year.  It is no longer available on their site.
Vinyls - TwinkledT "Frisky Chevron" (I purchased these a while ago, and I'm finally getting around to using them.)

I'll share with you how I created these nails but I would recommend you checkout Life is Nails on G+ or Instagram for a video tutorial (links to both accounts above), it will help tremendously though this is not a difficult nail art design.

Start out by painting three diagonal stripes in three different colors across the nail.  I wasn't concerned about them being perfect, but it is important that they are wide enough for a single vinyl to cover.  Apply a quick drying topcoat, and allowed to dry.  With the base colors dry, apply a vinyl over each stripe.  Proceed by painting a different color between each vinyl, be sure to remove the vinyls as quickly as possible to avoid pulls.


After a bit of cuticle clean up with gentle acetone and a brush, I applied a matte topcoat just to change it up a bit.


I love the design created by Ramie, and it was fun to recreate it though a little time consuming.  The only major differences, between hers and mine, is that I tried for a more Autumnal color scheme, used different vinyls (frisky chevrons vs. standard chevrons), and I applied a matte topcoat. 


All in all, I like Ramie's better but that is because she created them first.  Ramie, Life is Nails, is a major inspiration of mine, and I hope to be half as good as she is some day.


I hope you enjoyed my version of Life is Nail's Zigzag nails.  I'm curious about who inspires your nail art the most, is it fellow nail artist, a celebrity, a family member or friend?  Who's art do you look to when you find yourself in the need of a little encouragement? Please comment down below, I love to discover other nail artists and techniques.  Thanks for stopping by, see you next time.

Your Fellow Plebe,


Fall Swirly Gigs

Hello Lovelies!  I hope you all had a wonderful weekend and start of the week so far.  I had a wonderful weekend, I got to enjoy some time with my best friend who I don't get to see often enough.  I didn't have much time for nail stuff because I was out of town, but I did wear these nails over the weekend...


I actually created these nails for this week's Nail Art Nation prompt: Autumn Equinox.  Plus I wanted to use some polishes and vinyls I purchased recently.  I love fall, and fall colors, this season for me is never long enough and is just a whirlwind of activities.  So, I chose these colors and the swirly gigs to represent fall.

Materials I used:
Basecoat - SuperChic Lacquer "Bring It On!"
Polishes - Frenzy Polish "Penny! Penny! Penny!" & "If You Don't Fight You Die" (both from the TV Frenzy Collection)
Swirl Vinyls from Lou it Yourself
Small dotting tool
Topcoat - SuperChic Lacquer "Marvel"

I started off with two coats of "Penny! Penny! Penny!" which is inspired by The Big Bang Theory.  I have never seen this show but I had to have this polish when I saw it.  I topped this with a quick drying topcoat. (Please excuse the misshapen mid finger, I'm having a bad nail week.)


Once the base color was dry, I placed two of the smallest swirly gigs on my ring finger.  I then applied two coats of "If You Don't Fight You Die" based on my favorite TV show, Walking Dead.  I immediately removed the vinyls, because the secondary polish is matte it dries very quickly so it was important not to leave the vinyls on too long.  I finished off the accent by dotting tiny dots around the outside of the swirls in my primary color with a very small dotting tool.


I did a little clean up with gentle acetone and a brush, however I did not apply another layer of glossy topcoat like I normally do, I wanted to keep the two different finishes.


This is a very simple, but (for me) a very accurate interpretation of Autumn.  I love the colors and the contrasting finishes.  Both of these polishes are gorgeous on their own but they also make a good team.


I hope you are enjoying fall (for those of you who get to experience it) so far, and I hope you enjoyed this nail art design.  Thank you for stopping by, see you next time.

Your Fellow Plebe,


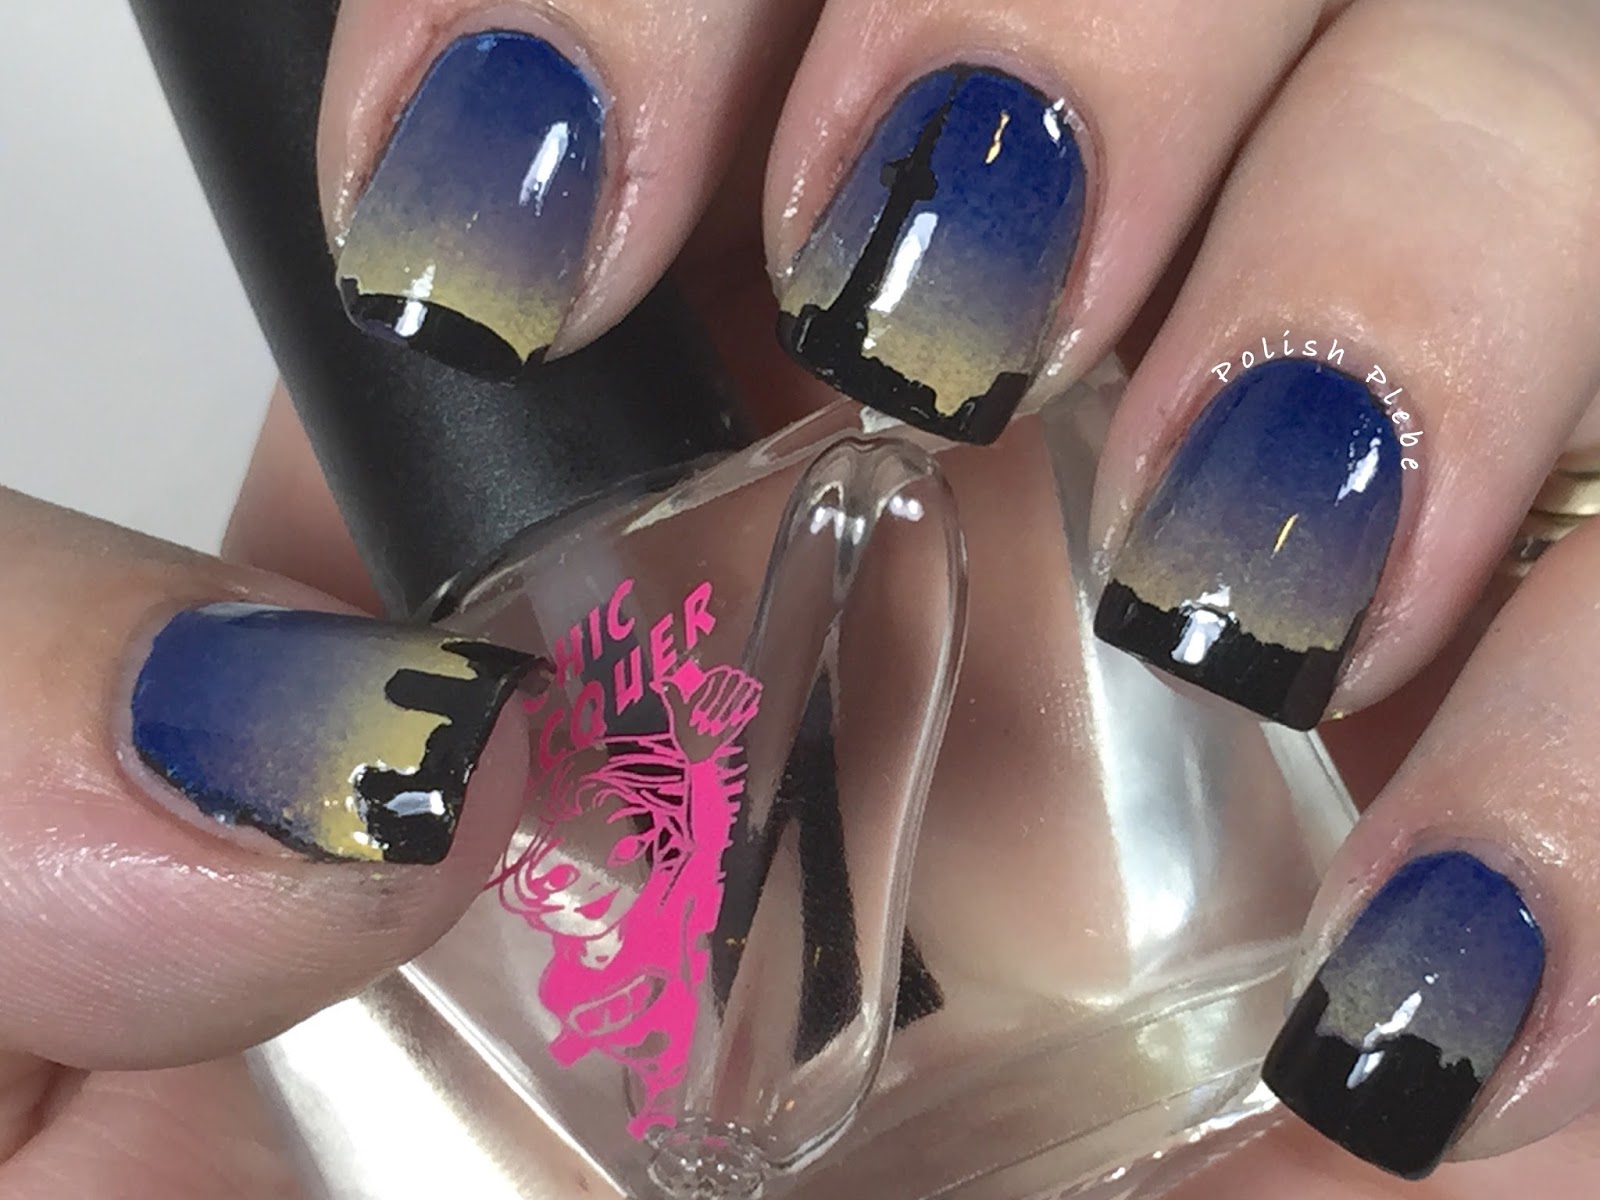
My Nails Did Skyline Vinyls

Hello Lovelies!  If you follow me on Instagram or you are part of the G+ Community, Nail Art Nation, you know that I have been very lucky lately.  Recently, I was the first to correctly guess what My Nails Did newest vinyl series was going to be and won a set of said series.  The new vinyls are City Skylines.  Shawna sent me a set that includes: London, Chicago, Toronto, Seattle, and NYC.

I decided to peal off the black boarder for two reasons, one so you could get a better view of the vinyls, and two to perform what I like to call a peal test.  These vinyls have so much detail, with lots of little crevices.  I was a bit concerned that they might not peal well, for that very reason.  I started out very slowly, expecting a piece to get stuck between buildings or to rip off the top of the tower.  I was pleasantly surprised that the backing pealed so smoothly and so easily, without a single problem.

I decided to test these out using the Toronto skyline for this tutorial and review, because it is a place I've always wanted to visit.  It's sad, I've lived the majority of my life in NY and I've never been to Canada.  There are two ways that you can use these vinyls, one way is to use them like a decal, and the second is to use them like a stencil.  I decided to use them as a stencil.

I started off with two coats of Chaotic Glitz 'Little Black Book.'  This was another prize from one of the recent giveaways that I won.  This is a really pretty black that has a holo shimmer to it, if you check my Instagram feed you'll see some macro shots of it that help show off that shimmer.  Also because I am using vinlys I applied a quick drying topcoat.

 
Once, my nails were dry I began applying the vinyls.  Now these vinyls are a little bit trickier to apply than some others because the skyline is one continues scene.  Therefore, you have to divide it amongst your fingers.  I did so by starting on my pinky, I placed it and then trimmed it with a small pair of scissors, and repeated this process across my nails.  However,  I had a slight problem when I got to the CN Tower and had to shift the vinyl slightly to make it fit on my nail.  If I had thought it out properly, I would have started with the placement of the most important building and adjust the others accordingly.  I made it work well enough though.


If you are using the vinyls as a stencil, remember to leave enough of the vinyl hanging off the end or side of the nail so that you can peal it off without disturbing your polish.  I also prepped my fingers with a liquid latex before I got to the messy goodness of the sponged gradient.


I did a sponged gradient of China Glaze 'One Track Mind,' 'All Aboard,' and 'Metro Pollen-tin.'  This may seem like a weird combination but my goal was to create a night time city light scene.  For the very first layer of sponging I applied a white over the three colors because I was sponging over black.  After, the first layer I proceeded with just the three colors and no white.  It took me about four layers of gradient to achieve the desired opacity.


I then pealed off all the vinyls and liquid latex barrier.  As you can see I had a couple oopsies along the edge of some of my nails.  There is also a little bleed over at the base of the CN Tower that happened when I removed the vinyl (hard to  see because of the glare). 


I performed a great deal of clean up some with acetone and a q-tip, and a bit with acetone and a brush.  I also used a small detail brush and fixed the messed up areas.  I also applied a final layer of quick drying topcoat.  I decided to use another of my new goodies Superchick Lacquer 'Marvel' quick drying topcoat.  It dried unbelievably fast, and as you can see is super shiney.  (I also used Superchick's 'Bring it On,' basecoat for this manicure too.)


The city glow turned out just the way I had hoped it would.  I was going to add some stars to the darker areas, but decided against it because I didn't want to take away from the gradient. 


Even though these vinyls require a little more effort during placement, I love the continuous scene.  The quality of the vinyls are excellent, the cuts were absolutely perfect.  I think it is wonderful that Shawna decided to create skylines of actual cities instead of just a generic city skylines, and she has many cities to choose from.  I'm super excited that she sent me a Seattle skyline, because it's one of my favorite cities, and I'm taking a trip there in October.  I'm sure you can guess what I'll be wearing on my nails.  This is my first experience with My Nails Did, and I was very pleased, she has many unique vinyls and you can bet that I'll be purchasing from her in the near future.


Also, if you don't see a city that your interested in send her an email, and she'll work with you to see if she can make it happen.  I hope you enjoyed this nail art design, and found the product review useful.  Thanks for stopping by, see you next time.

Your Fellow Plebe,


Wave Scaled Gradient

Hello Lovelies!  The wonderful Ashley of Ochouseofdecals sent me some really nice wave vinyls for me to try out and I couldn't wait to do this nail art design with them.  This is one of a few ideas I have for these vinyls so keep your eyes open for more ocean scene nail art coming soon.


I really wanted to do a scaled gradient with these vinyls because I felt it was the best way to represent the ever shifting and changing sea.  I also took this opportunity to use a couple of polishes that I haven't gotten to use yet from the Christmas in July Indie Collab box set I purchased last month.


Materials I used:
INM Ridge Free basecoat
Digital Nails 'Follow the Water'
Paint Box Polish 'Polar Bear Club'
Vinyls from Ochouseofdecals (coming to her Etsy shop soon)
Ellagee Lickity Split Latex Mani Mask (for easier clean up)
Makeup sponge
Quick drying topcoat

Start off with one coat of the lightest color to be used in the gradient.  I was pleasantly surprised how opaque Digital Nails 'Follow the Water' was with only one coat.  This polish is fully opaque with 1-2 coats, depending on how thin or thick you like to apply your polish.  I prefer thinner applications, myself.


After prepping your fingers with a latex mask, (if you don't have a latex mask use scotch tape, or a watered down Elmer's glue mix to protect your skin) begin the gradient.  Because this is a scaled gradient concentrated the initial gradient close to the smile line of your nail.  You want to leave enough room on the nail to be able to perform the gradient at least twice. 
 
Once satisfied with the first gradient, apply a quick drying topcoat.  It is essential to use a quick drying topcoat whenever using any vinyls or tape, without it the vinyls will pull the base polish off when removed. 
 
When the first layer is dry apply a vinyl about midway across the nail, you want to have enough of a gradient visible on the top of the nail and enough room to create a nice gradient on the bottom too.  Cover the top area where the completed gradient is either with a latex mask or a piece of tape, to protect it from your next layer of gradient. 
 
Repeat the gradient process on the bottom half of the nail, exactly as you did on the top half.  When satisfied with the opacity and blend, remove all vinyls and latex.
 
 
As almost always perform any necessary cleanup with acetone and a brush and apply a final layer of topcoat to seal in the design and give it a nice shine.
 
 
I love ocean and nautical scenes and these wave decals are perfect for creating such scenes.  Keep an eye on Ochouseofdecals for these vinyls, they should be arriving soon.  She also has a couple other nail vinyls available along with lots of fun vinyl decals great for decorating with.  Here is a macro shot so you can see the wave detail better...
 
 
Also, if you are interested Ellagee still has some Christmas in July box sets left.  It is a really fun indie collab box that is just packed full of pretty polishes (like the two used here,) and nail goodies.  I hope you enjoyed this nail art design and found the tutorial useful.  Thanks for stopping by, see you next time.
 
 
Your Fellow Plebe,
 

Nails Art Proudly Powered by Blogger